When it comes to website building, the standard way is that a client hires a web development agency or a professional web developer to build their website literally from the ground up. Such a process is complicated, time-consuming, costly, and requires a lot of ongoing conversation between the developer and the client to make sure they both have the same vision, which hopefully will lead to the desired outcome.
While this is an approach many big businesses take when establishing or updating their online presence, building a website manually is not an option for many small businesses or freelancers. The other option that suits many small businesses, freelancers, and anyone getting on the cloud to showcase their work and offer their services to the world is using a website-building service.
Currently, there is a tremendous number of online website builders that allow anyone with little to no experience to create their websites literally in a fraction of time and using a drag-and-drop tool. So, the task that seemed complicated and expensive a paragraph ago turned here into a fun game.
One of the most popular and widely used website builders out there is Wix. In previous stories, we have demonstrated some of the great features of this amazing website. In this article, we will go through the basic steps of building a website with Wix and getting it ready and published. This is going to be a fun tutorial, which hopefully will take as little as 20 minutes.
So, bring a cup of coffee, and let’s hop into it.
What is Wix?
Wix is a cloud-based website development platform that allows users to create and design their own websites without needing coding skills. It offers a range of customisable templates and drag-and-drop tools, making it accessible for both beginners and experienced web designers.
The platform is popular for its ease of use, flexibility, and a variety of features, including e-commerce capabilities, SEO tools, and integration with various apps. It is widely used by small businesses, individuals, and organizations to build websites for personal use, blogs, portfolios, online stores, and more.
How to Build a Wix Website in 20 Minutes
Wix mainly depends on editing pre-built templates that suit a great number of industries, which is offered by the regular Wix Editor, where all you need to do is just drag and drop items to customise the template the way you want. Well, this is precisely what we are NOT going to do today. We would rather do the opposite. Yes, we will build a website from scratch on Wix using a blank template.
Opening a Blank Template on Wix
So, first things first. You need to sign up on Wix, and you can do this either by using your Facebook or Google accounts or using your email address. If you already have a Wix account, go ahead and sign in, and you will be redirected to your dashboard.
Given that Wix has many options, three different types of editors and an enormous library of templates, which we all do not need here, all you need to do to open a blank template is actually to get on Google, type ‘blank Wix templates’, and hit enter. The first search result will hopefully be Blank Website Templates on Wix, so click that.
You will be taken to a page with many different blank template structures. Choose the completely empty one titled ‘Start from scratch’, and you will be directed to your Wix Editor with a completely white template in the middle, which is our starting point.
It is always good to have a design plan in mind, and much better if you transfer it on paper before you get started with building a website. Remember that the options on Wix are endless, and it is very easy to get caught up in them and feel overwhelmed. So, a plan is always a nice idea to avoid confusing yourself and wasting time.
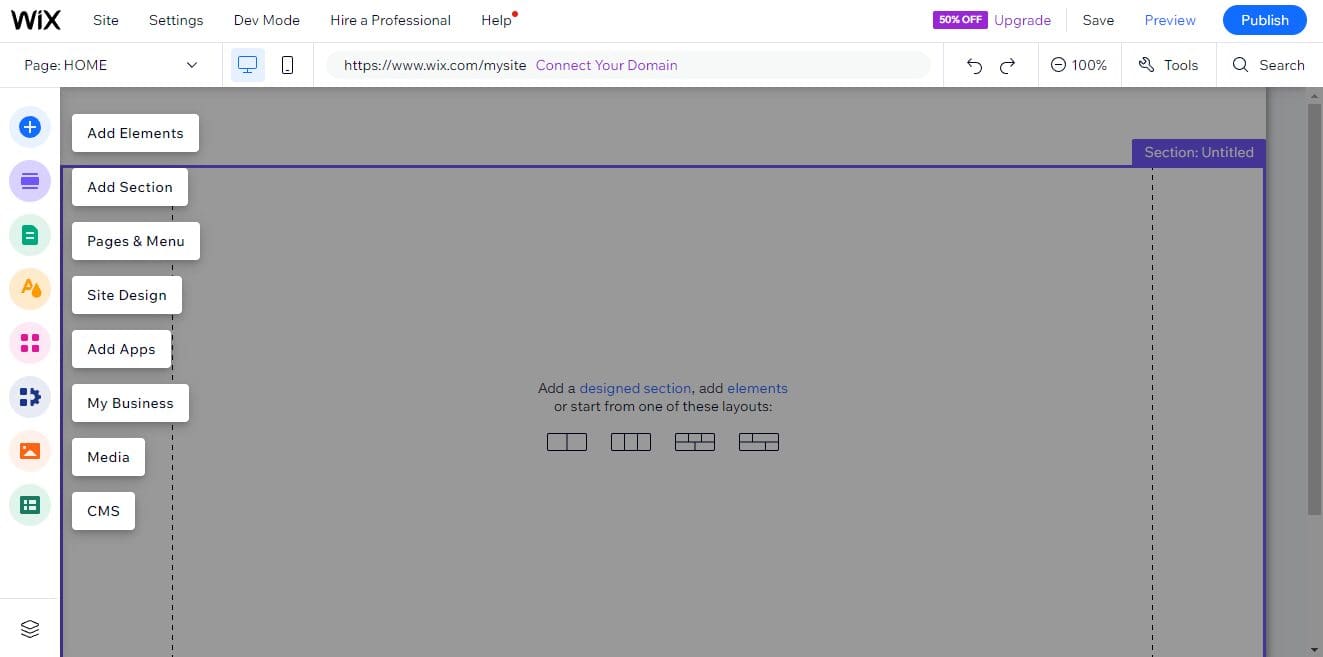
The three very basic things in this blank template are the header, the section, and the footer. So, the first thing you need to do is name your section. You can easily do that by hovering on the little blue box reading “Section: Untitled”, clicking on the little [T], typing the new section name, and clicking enter.
Once that is now complete, you should go and add a strip to design the elements needed in your website. On the left sidebar, choose the plus icon on the top. This is the Add Elements option. Choose Strip. You can find different categories of strips you can choose from. Pick the one that best appeals to you, and drag and drop it into your template section.
The strip will most probably have different dimensions from the section it is placed in, so now we should match both. To do that, click on the strip, then go to Tools on the top right bar and choose Toolbar. Tailor the height of the strip to 560. Then click on the borders of the section and tailor its height to 560. Now, your strip fits the section perfectly.
Adding Columns on Wix
Given that this section is the primary one on your Wix website, you would really want to attract some visitors with it. So, let’s get their attention by creating something a little bit more creative, nice, simplistic, and without being too over the top.
If you click on the strip, a few option icons will appear. Choose Layout, then Add Column. This will split your strip into two halves. Click anywhere on your strip and Choose Manage Columns, then Add Column.
Now, you have three columns in your section. You can change the sizes of your columns from the Layout option. You can either choose from the suggested column proportions or type the ones you want. For now, let’s stick with 60%, 30%, and 10%. This means the left column will occupy 60% of the page, the middle one will take 30%, and the one on the right will be only as small as 10%.
Inserting a Slider on Wix
The next step is to fill in these columns. For the big column, let’s add a slider, which is basically a slideshow, leave the second one blank, and have something to do with social media in the third 10% one.
Click the Add Elements plus icon on the left toolbar and type ‘Box slider’ in the search bar. Choose Box Slideshows from the results, and choose the one you like. Once you click it, it will be placed on your design. Move and shorten the slider to fit it perfectly within the first column. If you want to see how it will look on the website, click Preview on the top right corner of your Wix Editor. This can help you better adjust the slider.
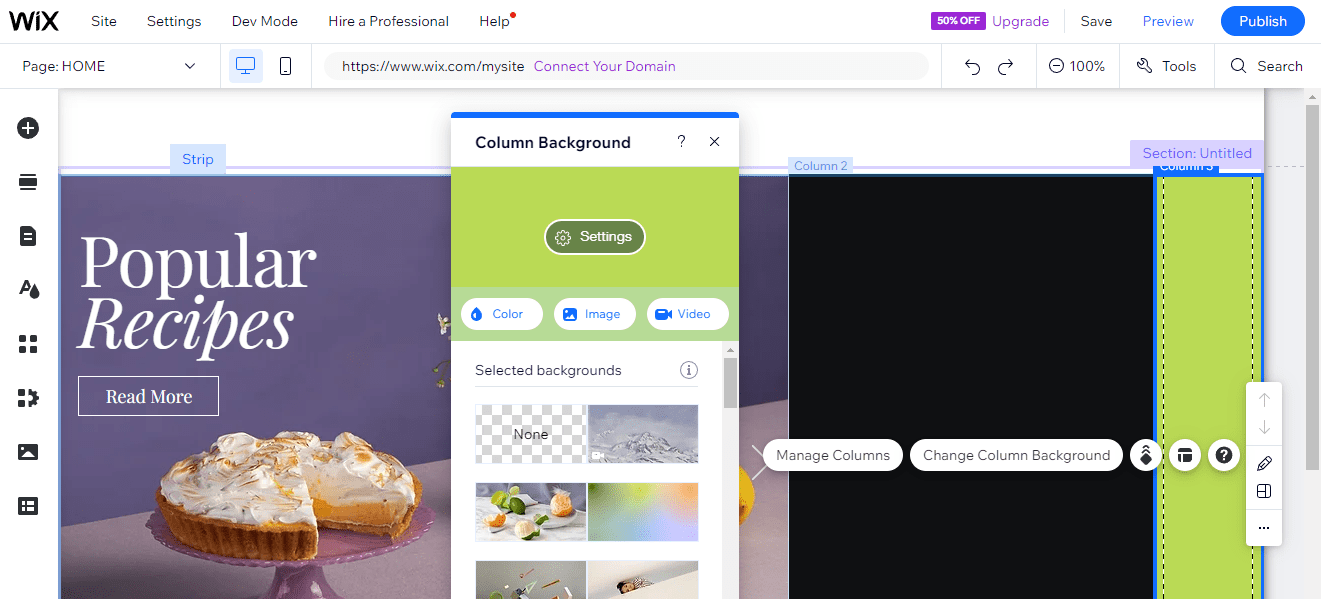
For the middle section, let’s change the colour of the background. Just click on the column and choose Change Column Background. You will be given options to change the colour, assign a picture or add a video as a background. Choose Colour and pick what you like. So, I do not need any more sections, but I will change the column background to black. Do the same for the third column.
Now, you need to click Preview and see if all three columns are perfectly aligned with one another. If not, go back to your Wix Editor to extend or shorten what needs to be extended or shortened to have a perfect alignment.
Adding Text on Wix
Now, what we need to do is customise the slides. First, you should remove the backgrounds of all slides. So, click on the slider, then Change Slide Background. Choose Colour, then white. On top of that section, you can find Slide 1 of 3. Move between slides and replace all their backgrounds with a nice plain white colour.
Now, you can design your slides the way you want. But remember that even though you removed the backgrounds and all items on each slide, the text sections are still there, and these are going to where you add the text you want to have on your website.
On slide 1, let’s add some text, let’s say something like ‘View Our Latest Blog’ or anything else of your choice. When you click the Text box and then Edit Text, you will find many options to adjust it. For instance, you can choose whether it is a heading or a paragraph, choose between many fonts, change font size, and make your text bold, italic, underlined, highlighted, or of any colour.
In the text box, you can also change the alignment of the text, add a bullet or a numbered list, and change text direction in addition to many other options. You can also drag the text box and place it anywhere on the slide and extend or shorten it to make the text loose or squeezed inside of it.
Once you are done with the first slide, go ahead and add text to the two other sides as well. When you are done with all of them, click Preview and see if your slides need further adjustment.
Adding a Picture Gallery on Wix
All right. Now, it is time to add a picture gallery to your slider. So, I am going to go here to slider, and add a box slider in. Once again, click Add Elements and search for the slider. Choose Slider Galleries and then pick one from the many options you are provided with. We are mainly adding this slider gallery to showcase and sell products, so it adds a little bit of depth to the website itself.
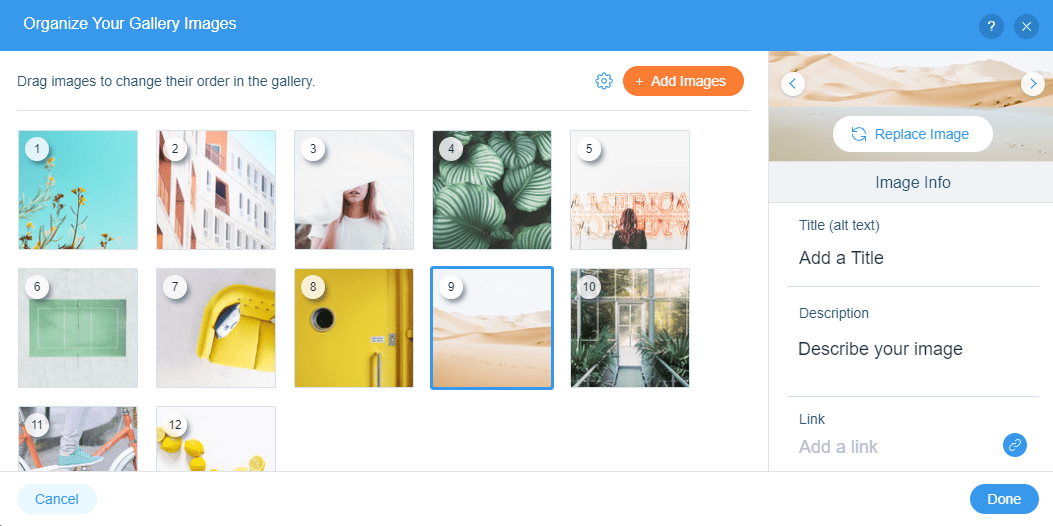
The gallery you choose will be placed on your design. You can drag and drop it wherever you want. Once you are satisfied with where it should be, you can change the images of the gallery by clicking on the gallery itself and then Change Images. A window with the images in your gallery will open. These are the ones you want to change. On the right side, you can find a Replace Image.
Once you click that, you will be be directed to another window with a whole new set of options to replace your gallery images. You can upload your own or look for images on Wix, Shutterstock, or Unsplash. Let’s go for Unsplash for now. Search for the pictures you want and choose as many as the slides in your gallery.
The images will then be added to the image management directory you opened before. Make sure you delete the old slider images and then organise the images you got from Unsplash on the slides. When you are done, click Done, and the images will be added to your slide gallery. Click Preview to see how the gallery looks.
Adding New Sections on Wix
What we have created so far is the homepage of your Wix website, and it has only one section, this one with the slider. Now, let’s lengthen it and add more sections. But before you do that, you have to add some free space on your homepage. You can do that by clicking the Add Section option that appears when you hover at the bottom of any section.
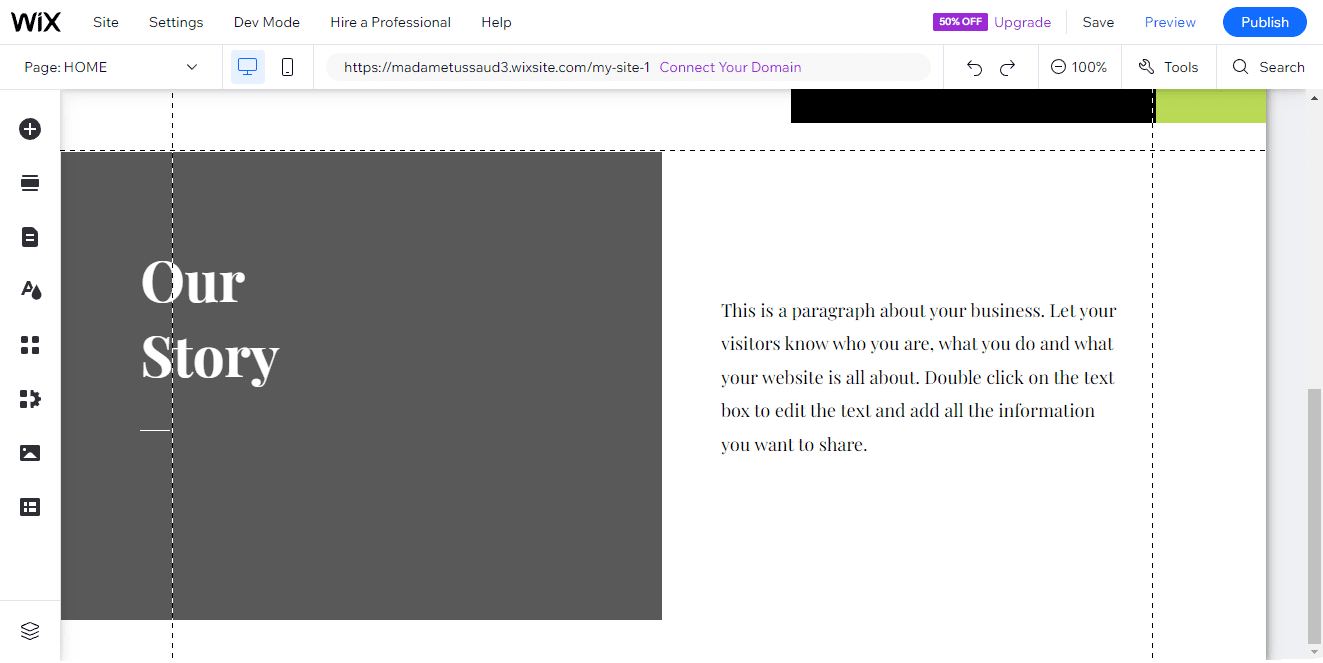
From the left bar, choose Add Section. Here, you can find so many different types of sections to add to your website. So, let’s first go for Our Story. Choose this item from the options, then drag and drop it under the slider section. Like we did before, you can change the background of the section and adjust the text the way you want.
Next, you can add a team section, and you can do that from the same section catalogue we opened before. Again, you can change the font of any text and the background colour of any section. But keep in mind that you need to make all sections as consistent and coherent as possible. It is recommended you use the same font in all sections and a suitable colour scheme.
Adding a Header on Wix
That is pretty much how to customise the main section of your website. The next thing to do now is to recreate the design for the header. So, go to Add Elements and select a strip again. Pick the same strip and adjust its height to 100 from the Toolbar option as we did before. Likewise, change the strip background colour to white.
The next step is to add three columns with the same dimensions as those in the main section. Hopefully, you remember the steps: click on the header strip, choose Layout, then Add Column. Click on strip again and then Manage Columns to add another one. So, now you have three equally-sized columns.
Then, you should give them the same sizes as the columns in the section. Click on Layout and change the proportions to 60%, 30%, and 10%. Next, choose the same background colours.
On the largest portion of the header, you should add a logo to your website. You could use the Wix Editor logo maker or you can create some using other platforms or applications, such as Photoshop. For the purpose of the article, we are just going to use a blank shape.
Go to Add Elements, Decorative, and choose the displayed shapes. Place your shape at the top right corner of the header, where usually your logo should go. When you preview your website, it might actually be something like that.
Adding a Menu Bar on Wix
On most websites, there usually is a menu bar where all the services or products are placed, as well as the other important website pages. So, let’s add this to our website. Click Add Elements, Menu & Anchor, then go ahead, select a menu, drag it and drop it in the header. Since you already have one page, only the Home menu item will appear.
To add the other sections on your homepage to the menu, click Pages & Menu on the left, choose Add menu item from the bottom, then select Section or anchor, and then choose the Our Story section. Do it as many times as the sections on your homepage. Make sure that the sections on the menu are in the same order as they are on the page. When you are done, click Preview to make sure everything is functional.
Adding Pages on Wix
Now, it is time to expand your website even more, and you could do this by creating multiple pages. From the left side, select Pages and Menu, Choose Add Page, and then you can create any pages by choosing from the menu or build from scratch using a blank page.
It is highly preferred, of course, to add multiple website pages, especially if you are building an e-commerce website. They are really good for SEO and ranking to have multiple-page websites.
Publishing Your Website on Wix
Now that your website is coming together, and if you are happy enough with how it looks, all you need to do now is click on Publish, and your site will go live. You will get a little popup saying, ‘Congratulations. Your site is published and live online.’ Of course, you can go ahead and select to view the site.
Renaming Your Website on Wix
So far, we have not actually given the site we built any names. So, when you view it, the name that will appear on the browser tab is just My Site + a number. To change the name of your website, select Site from your Wix Editor top menu and go to the My Dashboard.
Now, once you have selected My Dashboard, you will get a completely new screen of pretty much all the elements that you need for your website to be functional. Now that you have finished the designing, this is more of the background things.
You would have to connect your domain, add your blogs, add your SEO, and anything like that. If you are creating an e-commerce website, then you would have to add your first product. You have to make sure you tick all the boxes in order to launch your website. Click the three horizontal dots on the right section of your dashboard and then Rename Site and type the name you want.
Optimising Site for Mobile on Wix
Going back to the Wix Editor itself, there are other functionalities that you need to take into consideration, like the optimisation for mobile and tablet. Those are two important factors for website building as well.
On the top bar below the menu bar on your Wix Editor, you can see a mobile icon. Clicking this will switch to mobile, and this is where you can start seeing whether there are some misaligned items within your website.
If there are any coloured areas with no items on them, you can choose to hide them if you want to, or you can make any adjustments to make the site look well-put together and aligned on mobile. Nothing of what you do here will affect anything on the desktop view, which is great.
Conclusion
Building a website from scratch with Wix is so easy, thanks to the great features and options the website offers. You can choose from an enormous library of website types, pictures, icons, buttons, fonts, and even templates or build one completely from scratch, like what we did today, to create a great, professionally-looking site for your work or business in a short amount of time.
Organising Contact List WIX is crucial to running effective email marketing and communication campaigns. Without a well-structured database of your customers, prospects, subscribers, and other audiences,...