How to Use Wix Pro Gallery as a Category Area
Table of Contents
Wix is a great website builder that anyone can use to create functional and appealing websites. Whether you are an absolute beginner with no knowledge of coding or an expert who has worked in the industry for a decade, Wix’s enormous library of design elements and professionally-looking templates makes building your own website a quick, fun game rather than a heavy, discouraging burden.
What is also so good about Wix is that it offers templates for websites that suit all kinds of industries. Are you a writer who wants to start your blog? An artist who hopes to showcase their work to attract new clients? Do you make scented candles and wish to sell them online? Whatever you want is there on Wix, along with everything that will make your website functional, responsive, and attractive.
One of the greatest and most common elements that can be a total game-changer for many website types is galleries. Portfolios, for instance, require photo galleries to present artwork and attract a wider audience. In this article, we will show you how to add a photo gallery to your Wix website and then turn it into a category area. So bring a cup of coffee, and let’s hop into it.
Wix Pro Gallery
Wix is a popular cloud-based website-building platform that enables users to create professional and customisable websites without needing advanced technical skills. Known for its user-friendly drag-and-drop editor, Wix provides various tools, templates, and features that cater to individuals, small businesses, and large enterprises alike.
The Wix Pro Gallery, which is our focus today, is one of those great features that’s quite popular among designers and users who favour it for the following reasons:
Visual Appeal
Wix Pro Gallery transforms your website categories into visually striking elements by allowing you to represent them with high-quality images, engaging videos, or custom graphics. This approach replaces plain text-based lists with eye-catching visuals that immediately capture attention, making your site more appealing to visitors.
For instance, a food blogger could use the gallery to display categories like “Breakfast Recipes,” “Dinner Ideas,” and “Desserts,” each represented by vibrant, mouth-watering images. The visual allure draws users in and enhances their browsing experience, making your content more memorable. Additionally, pairing visuals with descriptive alt text improves accessibility and boosts your SEO performance.
User-Friendly Navigation
A well-structured Wix Pro Gallery is a visual roadmap for your visitors, simplifying their journey through your site. Users can quickly access the content they’re looking for with fewer clicks by linking gallery items directly to relevant pages or sections. The gallery’s intuitive layout options, such as grids or masonry styles, make it easy for users to scan and identify their desired categories at a glance.
For example, an online store could group products like “Clothing,” “Accessories,” and “Footwear” into a visually organised gallery, enabling customers to shop efficiently and with ease. This streamlined navigation engages visitors and reduces frustration, improving overall user satisfaction.
Customisation Options
One of Wix Pro Gallery’s greatest strengths is its extensive customisation options, allowing you to design a gallery that perfectly aligns with your brand’s identity. You can choose from various layouts, such as grids, sliders, or carousels, to display your categories in a way that suits your content and aesthetic goals.
Additionally, hover effects, animations, and transitions can be added to enhance interactivity and visual appeal. Customising the gallery with your brand colours, fonts, and style ensures a cohesive look across your website. For example, a fashion designer could use a sleek and minimalist layout with subtle hover effects to reflect their modern and sophisticated branding.
Increased Engagement
Dynamic visuals are naturally attention-grabbing and encourage user interaction, making them a powerful tool for increasing engagement. By using Wix Pro Gallery to showcase categories with visually compelling images or videos, you can entice visitors to explore further. Features like auto-play videos or animated hover effects add an extra layer of intrigue that boosts click-through rates.
For instance, a travel agency could use animated thumbnails that play short clips of destinations, inviting users to click and discover more about vacation packages. Adding call-to-action overlays such as “Explore Now” or “View More” can further enhance engagement, prompting users to take the next step.
When to Use Wix Pro Gallery
Wix Pro Gallery’s suitability depends on your website’s specific goals and content requirements. It is the best fit when:
- Your Website is Visual-Centric. It is Ideal for photographers, artists, designers, or anyone showcasing a portfolio. It is also perfect for bloggers or businesses that use images and videos to highlight categories, products, or services.
- You Want to Showcase Content Dynamically: If you prefer dynamic layouts like grids, masonry, or sliders to display content attractively, Wix Pro Gallery provides a variety of customisable options.
- You Value Customisation and Branding: The ability to tailor layouts, effects, hover animations, and captions to match your brand ensures a cohesive and professional look.
- You Need Optimised Performance: Wix Pro Gallery is optimised for fast loading while maintaining high-quality visuals, making it ideal for sites with heavy media usage.
- Improving User Engagement is a Priority: Dynamic visuals are known to grab attention and encourage interaction, making the gallery a great tool for increasing clicks and engagement.
Wix Pro Gallery as a Category
We are going to use a gallery as a category area. This means that every image in the gallery will be linked to one of the site pages. A category area like this one will make your website easier to navigate and even look more attractive.
Adding a gallery as a category is part of the website-building process. In other words, you should have already started creating your website on Wix, designed the homepage and added different pages before you can add a gallery that links to those pages.
We can add a gallery to your website if you have already done that.
Installing Pro Gallery
Right now, you should be on your Wix Editor, building and designing your website. What you need to do first before officially getting started is to install the Wix Pro Gallery.
To do so, go to Add Apps on the left bar and search for Wix Pro Gallery. Once you find it, just click Add to Site to install it. When this is done, click Open. If the app does not open, you can go to Add Elements, click Gallery, and access Wix Pro Gallery from there.
Secondly, you need to add a new section to your website’s homepage to insert the gallery. Decide where this will be, and then click Add Section to free up some space on your homepage.
Once you finish that, go back to your Pro Gallery from the left menu. Several gallery templates will be displayed there. Choose the one you like the most and click it to add it to the newly added section.
Customising the Gallery
Now that you have successfully added a gallery to your website, it is time to customise it. What you want to do first is to make sure you stretch the gallery to full width to take up the entire width of the page.
To do that, click on the gallery itself. A few icons reading Manage Media and Settings will appear, besides which there is a stretch icon. Click this, push the Stretch-to-full-width button, and set the Margins to 80 px. Your gallery will automatically enlarge and fit the entire section.
Managing Media
Now it is time to manage the media in your gallery. You can do that using a whole set of different options, which you can access by clicking on the gallery again and choosing Manage Media.
First, you can increase or decrease the number of images in the gallery, and you can do that from Manage Media. For now, let’s just have four. When you delete the extra photos, you can see that the layout looks different. The four remaining images have become bigger to fill out the entire section.
Up next is to make the gallery yours. Given that this is a template and you are building a gallery to showcase your work, you need to replace the default images in the gallery with yours.
For that, click on Manage Media, choose Replace Image, and a new window will open. You can upload images from your computer or use photos you have previously uploaded to your Wix dashboard.
If you do not have any images to add, you can use some of the Wix designs or get pictures from other online platforms connected to Wix, such as Shutterstock and Unsplash.
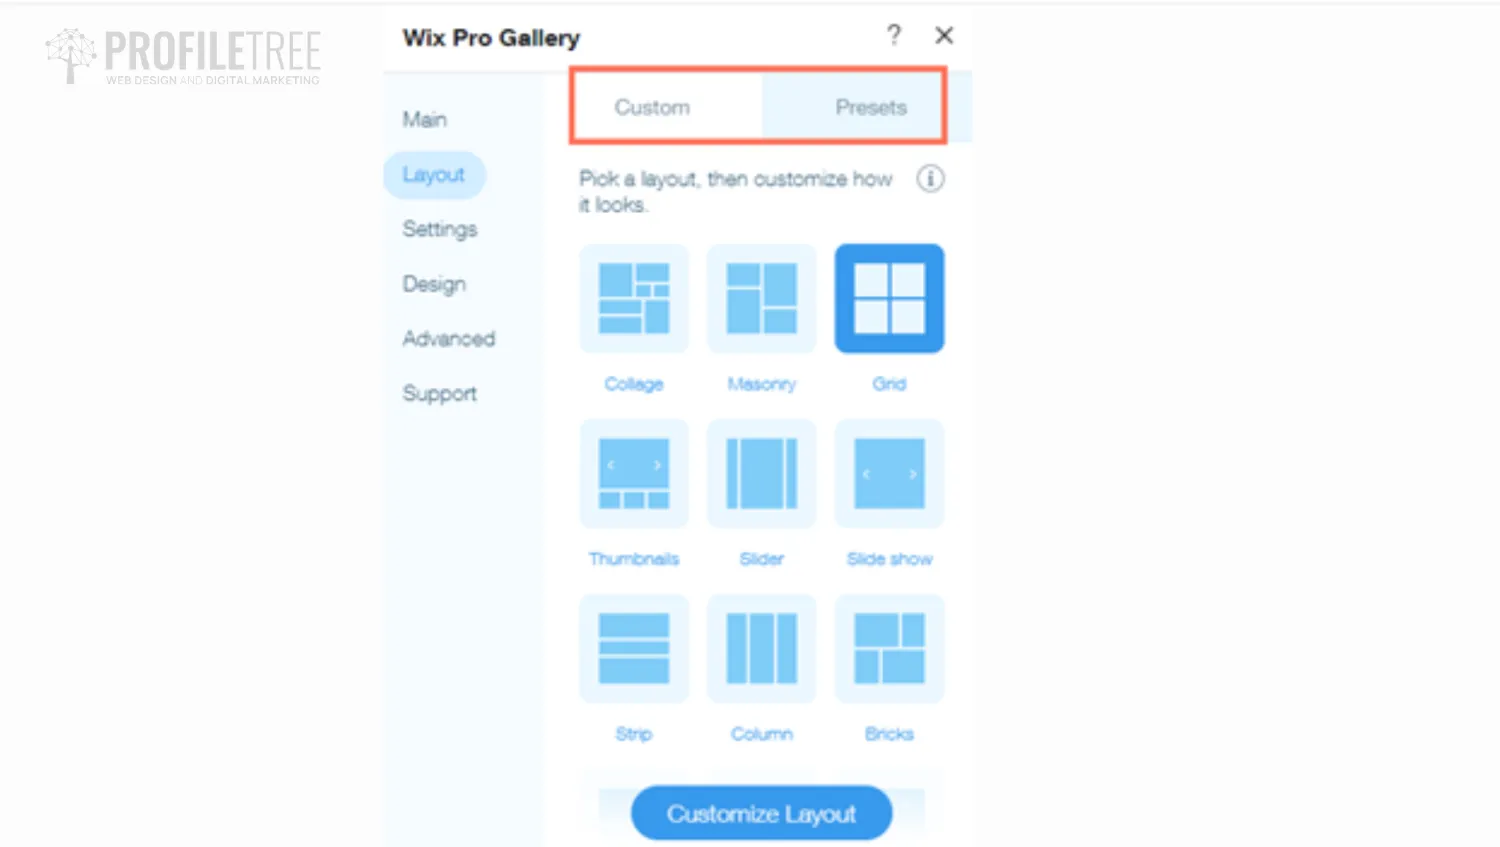
You must work on their layout now that you have added new images. Click on the gallery, then Settings, and the same Wix Pro Gallery window will open. You can find different options on the left bar of that window: Main, Layout, Settings, Designed, Advanced and Support. We will use some of those to customise the layout of your gallery.
From Layout, you can choose from many grids. This is how the images will be displayed in the gallery. They can be all of the same size or you can change their arrangement making some bigger than others. Choose the grid that you find the most suitable for your gallery and the images will be automatically adjusted.
From this Layout option, you can change the scroll direction from horizontal to vertical, resize the thumbnail, change the image ratio, set the number of images per row, and adjust the spacing between the pictures. When you customise these, you can click Preview on the top-right corner of your Wix Editor to see how your changes will appear on the website.
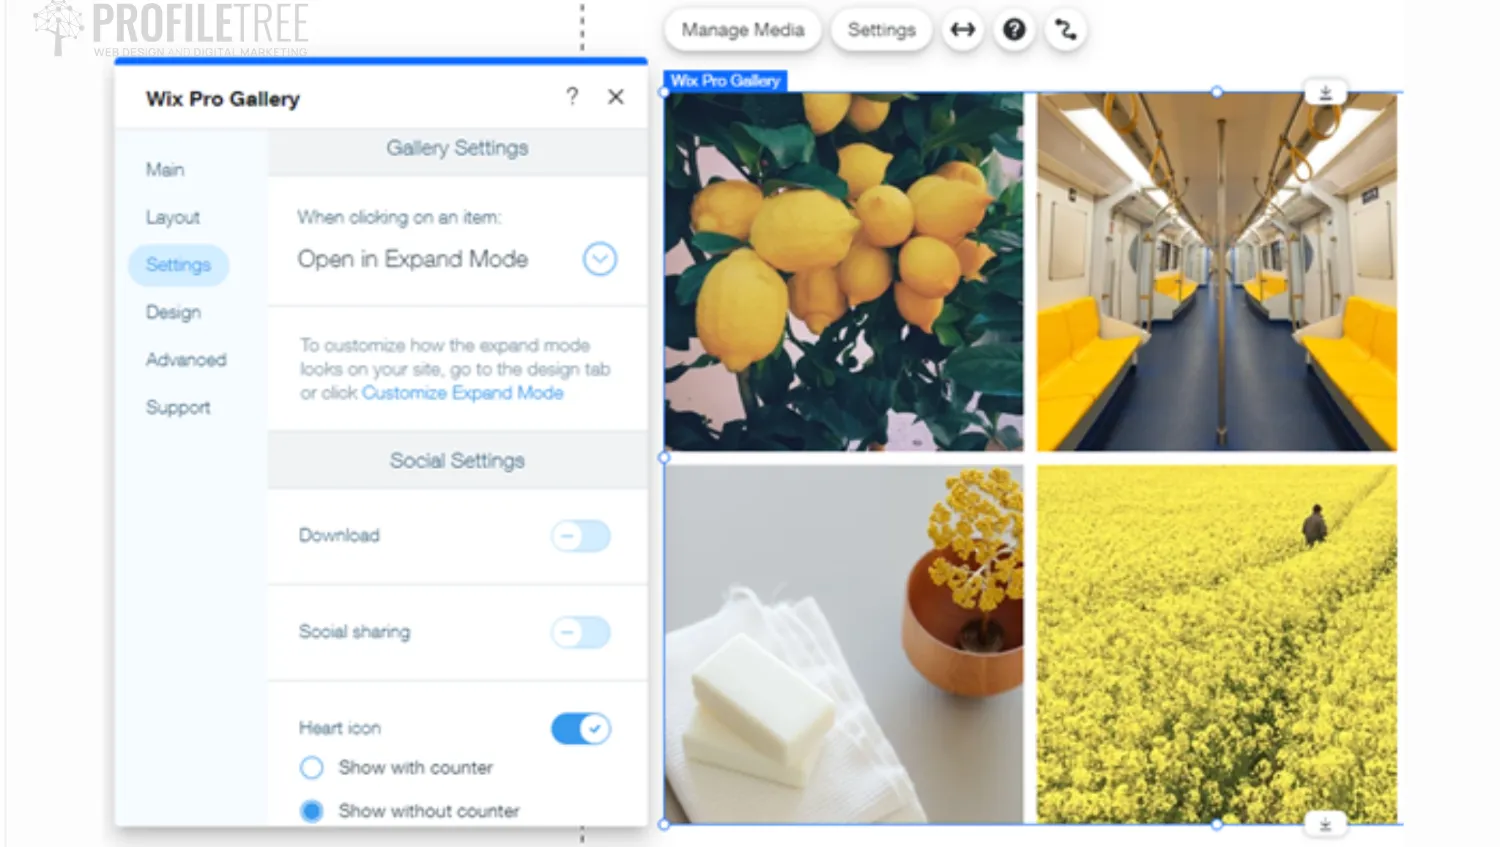
One thing you may realise when you preview your gallery at this point is that a little heart icon appears in the bottom-left corner of each image. Well, we need to remove that. So go back to your Wix Editor. Click on the gallery and choose Manage Media, then Settings. There, you can find a button for the heart icon. Push that.
From this window, too, you can make the images downloadable and shareable on social media.
Next, optimise the design of your gallery. From Manage Media, click on Design. From there, you can control things like the overlay colour percentage, the overlay effect, and the gradient. You can also adjust the text, choose whether you want the title, description, or both to appear on the images and even choose their position on the images. This can be underneath, above, or on the image.
To make the text appear beneath, above, or on each picture, go to Manage Media, click on each picture, and type the text you want in the Image Title box. To change the font of the text, all you need to do is go to the Site Design from the left bar. From the Site Theme, click Text and choose from the different font options and themes.
Linking to Pages
Now that your gallery is almost put together, we want to link each image to one of your website pages to create this category area.
Click on the gallery and choose Settings beside Manage Media to open the Wix Pro Gallery. There is an item called ‘When clicking on an item’. This one has four options, so choose ‘A link opens’.
Next, go back to the Manage Media control, where you can see all four images in your gallery. Click on the first image. If you scroll all the way down the options on the right side, you will see a ‘Link’ option. Click that, choose the page you want to connect to the first image and click done.
Repeat the same thing with the rest of the images. When you are done, preview the site. If all the steps were done right, the linked website pages should open once you click the images. If something is not working properly, return to your Wix Editor and fix it.
Best Practices
Using best practices when setting up Wix Pro Gallery as a category area ensures your website is visually appealing but also functional and user-friendly. Here are some of them:
Keep it Simple
A cluttered gallery can overwhelm visitors and make navigation more difficult. To maintain a clean and user-friendly design, focus on showcasing only the most important or frequently visited categories. Aim for a balanced layout where each category has enough space to stand out without competing for attention.
For instance, if you’re running a blog, you might feature primary topics like “Travel,” “Food,” and “Lifestyle” instead of an exhaustive list. Simplicity ensures the gallery remains visually appealing and easy to navigate, encouraging users to explore further.
High-Quality Visuals
The visuals in your Wix Pro Gallery are the first thing visitors will notice, so ensure they are high-quality and aligned with your brand’s aesthetic. Blurry or poorly lit images can detract from the overall professionalism of your site. Use crisp, well-composed images relevant to the category they represent.
If possible, incorporate original content or professional stock photos. For videos, keep them short and engaging, highlighting the essence of the category. High-quality visuals elevate your website’s appearance and build trust with your audience.
Descriptive Titles
Your category titles should instantly convey what users can expect when they click. Avoid vague or overly creative titles that might confuse visitors. Instead, opt for clear and concise labels that describe the content accurately.
For example, instead of a generic “Products” label, use specific titles like “Eco-Friendly Bags” or “Handmade Jewelry” to provide more context. Pairing descriptive titles with visuals also helps with accessibility and SEO, making it easier for search engines to index your site effectively.
Consistent Updates
Maintaining a dynamic and engaging website is essential to keep your gallery content fresh. Regularly update visuals to reflect seasonal themes, new products, or recently published content. Broken or outdated links can frustrate visitors and harm your site’s credibility, so periodically check and update links to ensure they direct users to the correct pages.
For instance, if you’ve added a new category or updated a section of your website, make sure your gallery reflects these changes. Keeping the gallery current demonstrates professionalism and encourages repeat visits.
Conclusion
Using Wix Pro Gallery as a category area is a powerful way to enhance your website’s visual appeal and functionality. By leveraging its dynamic layouts, customizable designs, and high-quality performance, you can create an engaging and user-friendly experience that encourages visitors to explore your content further. Whether you’re showcasing products, blog topics, or services, the gallery offers a polished and professional way to organize and present your categories.
To make the most of it, focus on best practices: keep the layout simple, use high-quality visuals, provide clear titles, and regularly update your content. By doing so, you’ll improve navigation and build a strong connection with your audience, driving engagement and boosting your site’s overall effectiveness.