In this article, our focus is on identifying the optimal free e-commerce website builder. Choices abound, including Squarespace, WooCommerce, Gudade, Shopify, and Weebly, each with unique strengths and weaknesses. Squarespace appeals primarily to creatives, while WordPress users favour WooCommerce. God Eight facilitates swift website creation, and Shopify offers comprehensive store-building features. Weebly caters well to small enterprises.
However, Wix emerges as the frontrunner for a versatile solution tailored to individual sellers. This presentation will explore its merits and drawbacks and conclude with insights on effective website establishment. Let’s dive in.
Benefits of Wix
When considering the benefits of Wix, several key specifications stand out:
Its ecommerce functionality provides essential technological support for online business operations.
Wix offers features such as Site Booster and Visitor Analytics, which are crucial tools for enhancing website visibility and monitoring traffic flow. Site Booster focuses on search engine optimisation (SEO), contributing to increased website traffic by optimising search engine rankings.
Meanwhile, Visitor Analytics provides insights into site visitor demographics and behaviour, aiding in strategic decision-making.
Wix offers the option of a free domain transfer for users migrating from other platforms, providing flexibility and convenience.
Furthermore, the platform boasts unlimited bandwidth, ensuring smooth and uninterrupted website performance. Another compelling reason to choose Wix is its extensive selection of customisable templates, catering to various industries and individual preferences. Whether creating a clothing store, automotive dealership, or specialised parts shop, users can easily find suitable templates tailored to their needs. This abundance of options underscores Wix’s appeal as a versatile and user-friendly website-building solution.
One of Wix’s standout features is its extensive library of customisable templates. Users can effortlessly explore various design options to find the perfect fit for their website. Moreover, Wix supports over 180 languages, making it a highly accessible platform for global users. Whether creating a personal blog or a multinational e-commerce site, multilingual support ensures your content can reach a diverse audience.
Furthermore, Wix provides robust customer support, offering assistance and guidance to address any queries or issues that may arise during the website-building process. The platform’s user-friendly interface streamlines the website creation process, making it accessible even to those with limited technical expertise. Additionally, Wix offers a free version, allowing users to test the service before committing to a paid plan. However, it’s important to note that while you can build and publish your website with the free version, it will only be accessible via a Wix-generated link and won’t be live without a domain.
It’s important to note that while Wix offers a free version for website creation, there’s a catch – you’ll need to subscribe to a monthly plan to publish your site entirely. The cost is relatively low, starting at around four pounds or six to seven US dollars per month, but ultimately depends on your willingness to invest in your website’s visibility and functionality. The monthly subscription fee can be worthwhile if you’ve gone through the verification process and ensured everything is in order. However, there are some limitations to consider.
Firstly, you can’t switch to a different template once you’ve chosen one and begun building your website. This restriction applies particularly if you opt for Editor X, a more complex platform than the standard Editor or ADI (Artificial Design Intelligence). Additionally, only the most premium plans offer e-commerce capabilities, limiting options for those on a budget. Lastly, the array of features and options available on Wix can overwhelm beginners, particularly when choosing between Editor X, Editor, or ADI. This complexity may prompt some users to seek alternative platforms or additional tutorials for guidance.
Building a Free E-Commerce Website on Wix
Now that we’ve explored the advantages and disadvantages of using Wix let’s delve into the practicalities of building an e-commerce website. Creating a site on Wix involves:
Several straightforward steps.
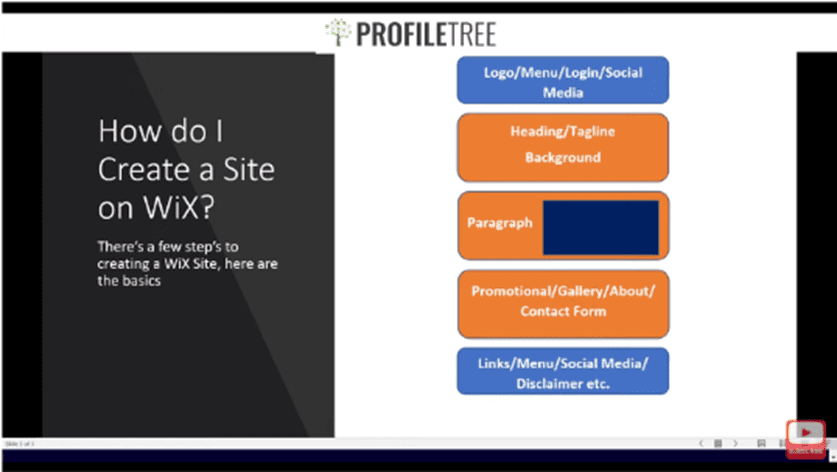
Starting with the establishment of a header and footer.
Organising sections in between.
The header typically encompasses essential elements such as a logo, menu, login, or social media links, with room for additional customisation.
In the sections, you can incorporate headings, taglines, paragraphs, images, or any other content relevant to your site’s theme. For an e-commerce site, consider including a promotional gallery, contact form, and other features to facilitate customer interaction and transactions. Lastly, the footer serves a similar function to the header, providing continuity and navigation options across the site. Following these steps can lay the foundation for a functional and visually appealing e-commerce platform on Wix.
While the layout and presentation may vary, the fundamental elements of your e-commerce website remain consistent for visitor engagement. This includes essential components such as links, menus, social media integration, and disclaimers. Having covered the introductory aspects of selecting a free e-commerce website builder, let’s proceed to the signup process tailored explicitly to Wix.
Upon accessing the signup/login page, you’ll encounter options for both new users and existing account holders. For newcomers, simply click on the signup section and provide your email address and chosen password. Alternatively, you can expedite the process by logging in through your Google or Facebook account. Once logged in or signed up, you’ll gain access to Wix’s array of features and tools for creating your e-commerce platform.
Upon initiating the login process, existing users will be directed to their account page, while new users will encounter the signup prompt. Once you’ve completed the signup procedure, the next step involves selecting the platform for your website. This stage may initially seem confusing, as Wix offers two options: Wix and Editor X.
It’s important to note that Editor X is geared towards more advanced users and may not be suitable for beginners or those with intermediate skills. Therefore, it’s advisable to choose Wix for simplicity and ease of use. After selecting the Wix platform, you’ll be prompted to specify the type of website you intend to create. Since we’re focusing on e-commerce, selecting “Online Store” is the appropriate choice. From there, you can explore various pre-designed templates tailored to your niche, such as an auto parts store. Once you’ve selected it, you can customise your site and give it a suitable name, such as “AutoPro Parts.”
Customising Your Website Layout and Design
After naming your site “Auto Spares,” you’ll proceed to the next page, where you can choose additional features to include on your website. Wix provides access to its marketplace, offering a variety of add-ons to enhance functionality. While an online store is already integrated, you can include features like a chat box, blog, portfolio, and more. For our e-commerce site, we’ll focus on essential elements like product showcases and contact forms.
Once selected, you’ll encounter another decision point regarding the website editor. While Wix Editor is the primary option, you’ll also see alternatives such as Editor X and Wix ADI (Artificial Design Intelligence). Wix ADI offers a user-friendly approach for beginners, leveraging AI to assist in website creation. Alternatively, Editor X provides advanced design capabilities, allowing for greater customisation with features like CSS grid layouts and custom breakpoints. While Editor X may present a steeper learning curve, it offers unparalleled flexibility for those seeking highly personalised designs. Depending on your preferences and level of expertise, you can choose the editor that best suits your needs and customise your website layout and design further.
Upon reviewing the template options provided by Wix, it’s evident that they offer a selection of contemporary designs suitable for various purposes. These templates serve as a starting point for your website, providing a visually appealing foundation that can be customised to fit your brand identity. The “Product Launch” template is a potential choice for Auto Spares due to its relevance and modern aesthetic. However, it’s important to note that you can select any template and modify it according to your preferences. In addition to pre-designed templates, Wix offers wireframes, which serve as blank canvases for more personalised design endeavours. These wireframes provide a starting point for customisation, allowing you to tailor your website layout to suit your needs. You can better understand its layout and functionality by viewing a wireframe in Editor X. The Editor X interface offers intuitive tools for creating dynamic and visually striking websites, from brand logos and menus to hero sections and fluid animations.
The intricately designed website in Editor X demonstrates the extensive animation capabilities and comprehensive footer options available within the platform. However, it’s worth noting that such advanced features come at a premium price. Editor X commands a steeper pricing structure than the more user-friendly Wix adi and standard Wix Editor.
While basic plans for Wix Editor start at around four pounds, accessing the same level of functionality in Editor X may require an investment of around £16 or more. This significant price disparity highlights the advanced nature of Editor X and the additional value it offers in terms of customisation and design flexibility. In the upcoming sections of this tutorial, we’ll delve into the specific pricing plans for both Wix Editor and Editor X to provide a comprehensive understanding of their respective costs and features. For now, let’s focus on building the website using the standard Wix Editor, which offers optimisation options for both tablets and mobile devices.
Now, let’s navigate through the Wix web editor, where we’ll begin building our website. Clicking on the “Start” option initiates the process, presenting a range of website templates. Among the available options are templates tailored for specific industries, such as auto part stores, bike parks, sporting goods stores, and car dealerships. For our purposes, let’s explore the template designed for an auto parts store.
Upon selection, the editor automatically populates the search field with relevant keywords, streamlining the process of finding the desired template. This ensures that we can quickly access and customise a template that closely aligns with our website’s vision. Let’s explore the features and customisation options offered within the chosen template to begin crafting our auto parts store website.
To build a website with a similar structure to our reference site, we’ll begin by selecting a blank template and starting from scratch. By opting for a blank canvas, we have full creative control over the design and layout of our site. Clicking on the “Add” button presents various blank website templates, each offering a different starting point for customisation. With hundreds of templates available, users have ample options to create a website tailored to their unique vision and requirements. Once the blank canvas is selected and loaded, we’ll discuss the essential components for website design. Throughout this process, I’ll guide you step by step, replicating elements from the previously viewed template to ensure consistency in our design approach. Let’s dive into the creation process and begin crafting our custom website.
Website Building Tools
Let’s dive into building our site, demonstrating just how straightforward it can be. With the blank canvas before us, we’re equipped with essential tools to streamline the design process. The toolbar at the top provides access to various functions, including layers, rulers, guidelines, and objects, which we’ll utilise as we progress through the site build. Additionally, the side panel on the left grants quick access to add elements, sections, pages, and menu options.
As mentioned earlier, the marketplace offers a plethora of additional features and functionalities to enhance our site. Before delving into the design, it’s essential to establish the layout by defining sections such as the header, main content sections, and footer. Renaming sections, like our Hero section, provides clarity and organisation. Utilising the toolbar, we can easily adjust the dimensions of sections to our specifications. For instance, if we desire a larger Hero section, we can simply increase its height. Adding strips to sections enhances visual appeal and contributes to site responsiveness. We can customise strip backgrounds, including incorporating video backgrounds for a dynamic effect. With these tools at our disposal, let’s embark on the creation journey, starting with the establishment of our Hero section and incorporating video backgrounds to add depth and visual interest to our site.
Customising the Header Section
Now, let’s focus on refining the header section of our website, aiming to replicate the layout observed in our reference site. As demonstrated, adjusting the background video and previewing the changes in real-time ensure seamless integration of dynamic visual elements. For those seeking further customisation, the option to modify the entire page background via site design provides additional flexibility. By accessing media from Wix and searching for specific themes like “automotive,” users can easily locate suitable background options. Following this, we’ll construct the header section, which typically includes elements such as logos, taglines, navigation menus, and functional components like search bars and login options.
Examining the reference site, we notice a distinct layout comprising two strips with a central lane. Replicating this structure involves carefully measuring and placing the strips to achieve the desired alignment. Utilising tools such as the toolbar and layers panel facilitates precise adjustments and positioning of elements. Incorporating decorative elements like horizontal lines further enhances the visual appeal of the header. We ensure a cohesive and visually pleasing header section by customising strip backgrounds and lane designs. Previewing our progress allows us to confirm that the layout and design elements align with our site vision. Let’s continue refining the header section, ensuring it effectively conveys the brand identity and enhances user experience.
After adjusting the thickness of the lane to a more suitable size, we’ll refine the header section. We can fine-tune the design elements by navigating through layers and strip settings to achieve the desired aesthetic. With the lane now at an optimal thickness of 1px, our header section appears sleek and visually appealing. Let’s shift our focus to the Hero section, where we’ll showcase compelling content to captivate visitors’ attention. Renaming the “Hero ” section enhances clarity and organisation within the design interface. Instead of adding a strip, we’ll leverage the existing background to maintain a seamless visual transition.
Adjusting the section’s height to approximately 650px ensures adequate space for content display. Next, we’ll incorporate text elements to convey our message effectively. Copying text from our reference site and applying it to our Hero section streamlines the content creation process. By customising strip settings to ensure transparency and full-screen stretch, we can optimise the layout for a visually impactful presentation. Aligning content to the left side and transforming strip backgrounds further enhances the section’s visual appeal. With these adjustments in place, we’re ready to add and style text elements to convey our message effectively within the Hero section. Let’s continue building our site, creating engaging and visually stunning content to captivate our audience.
Now that we’ve filled in the remaining content sections let’s take a moment to review our progress. Our header section is nearly complete, with only minor adjustments for the search bar, login, and basket functionalities. Moving forward, we’ll focus on adding the final details and incorporating the shop section, where visitors can explore and purchase products. Additionally, we’ll include sections highlighting specific car parts, promote our premium club subscription, feature additional blog content, showcase partner brands, and finalise the footer section.
With these elements in place, our site will offer a comprehensive user experience catering to our audience’s various interests and needs. As we proceed with these tasks, it’s important to note that creating a logo can significantly enhance the brand identity of our site. Utilising basic shapes and design elements available in the toolbar, we can craft a logo that effectively reflects our brand’s essence. Let’s continue our site-building journey, ensuring each component is meticulously crafted to deliver an engaging and seamless browsing experience for our visitors.
Creating a Logo with Wix Logo Maker
Before we proceed further, let’s explore the process of creating a logo using Wix Logo Maker. This tool offers a convenient way to design a logo tailored to your brand’s identity. Let’s dive into it.
Accessing Wix Logo Maker: To begin, navigate to the Wix Logo Maker platform, which provides intuitive tools for logo creation.
Choosing Logo Preferences: Upon entering Wix Logo Maker, you’ll be prompted to specify your logo preferences. You can indicate whether you prefer to design the logo yourself or enlist the assistance of a professional designer. Let’s select the option to design the logo ourselves for our purposes.
Defining Brand Details: Next, input your brand name, such as “Auto Spares,” and optionally add a tagline to further define your brand identity. Specify that your logo is for the automotive industry.
Selecting Design Preferences: Wix Logo Maker will prompt you to choose design preferences that align with your brand’s style. You can select from design characteristics, such as modern, fresh, formal, and dynamic, to guide the logo creation process.
Exploring Logo Options: After you provide your design preferences, Wix Logo Maker will select logo options based on your input. Take your time to explore these options and identify designs that resonate with your brand identity.
Customising the Logo: Once you’ve identified a preferred logo design, you can further customise it to suit your preferences. Wix Logo Maker offers tools to adjust colours, fonts, and other design elements to ensure the logo aligns perfectly with your brand.
Reviewing and Finalising: After customising your logo, take a moment to review the final design. Ensure it accurately represents your brand identity and communicates the desired message to your audience. Once satisfied, you can finalise and incorporate the logo into your website.
You can create a professional and visually appealing logo that enhances your brand’s identity by utilising Wix Logo Maker. With its user-friendly interface and customisable options, designing a logo that captures the essence of your brand has never been easier. Let’s move forward with incorporating this logo into our website design.
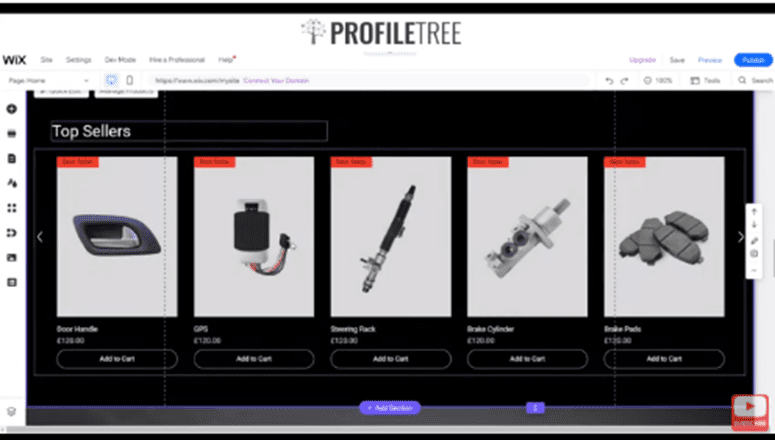
Adding Products and Implementing Search Functionality
Now that we’ve set up the basic structure of our e-commerce website, it’s time to add products and implement search functionality to enhance the user experience. Let’s walk through these steps:
Adding Products:
Navigate to the Wix App Market and search for the Wix Store app.
Click on the “Products” tab to manage your products.
Click the “Add Product” button to create a new product listing.
Fill in the necessary details for your product, including title, description, price, and images.
Optionally, you can categorise your products to organise them effectively.
Save your product listing.
Implementing Search Functionality:
Access the Wix App Market again and search for a site search app compatible with Wix.
Install the site search app on your website.
Once installed, access the site search app from your website editor.
Customise the search bar to match your website’s design preferences.
Configure the search settings to include product listings in the search results.
Test the search functionality to ensure it accurately retrieves product listings based on user queries.
By adding products and implementing search functionality, you provide users with a seamless browsing experience, allowing them to easily find and explore products of interest. Additionally, incorporating search functionality enhances the usability of your e-commerce website, improving overall user satisfaction and increasing the likelihood of conversions.
Final Steps and Considerations
In conclusion, we’ve covered the essential steps to create an e-commerce website using Wix. Here’s a recap of what we’ve accomplished:
Building the Website Structure: We started by setting up the basic layout of the website, including headers, hero sections, product galleries, and other relevant sections.
Adding Products: We added products to the website using the Wix Store app, including details such as title, description, price, and images. Categorising products can help organise them effectively.
Implementing Search Functionality: We incorporated search functionality to allow users to easily find products of interest. This enhances the user experience and makes navigation more intuitive.
Setting Up Payment Methods: We connected payment methods such as credit cards, PayPal, and manual payments to facilitate transactions on the website. Secure and convenient payment options are crucial for e-commerce success.
Configuring Shipping and Delivery: We set up shipping options, including free shipping, flat-rate shipping, and local delivery. Providing clear shipping policies helps manage customer expectations and reduces cart abandonment.
Optimising SEO: We optimised the website for search engines by adding relevant keywords, meta descriptions, and titles. This improves visibility and helps attract organic traffic to the website.
Connecting a Domain: We connected a custom domain to the website to establish a professional online presence. A memorable domain name reinforces brand identity and improves credibility.
Choosing a Pricing Plan: We selected a suitable pricing plan based on the website’s requirements, considering storage, bandwidth, and e-commerce features. Upgrading to a premium plan unlocks additional benefits and functionalities.
By following these steps, you can create a fully functional e-commerce website on Wix and start selling products online. Remember to update and maintain your website regularly to keep it relevant and engaging for visitors. If you have any questions or need further assistance, feel free to reach out for support. Good luck with your e-commerce venture!
Optimising eCommerce websites for enhanced conversion rates is an essential strategy for businesses striving to maximise their online potential. Conversion rate optimisation (CRO) methods offer a...
Having a website is now more pivotal than ever. Whether you’re an individual, business, or organisation, a well-crafted website not only enhances your credibility and visibility...
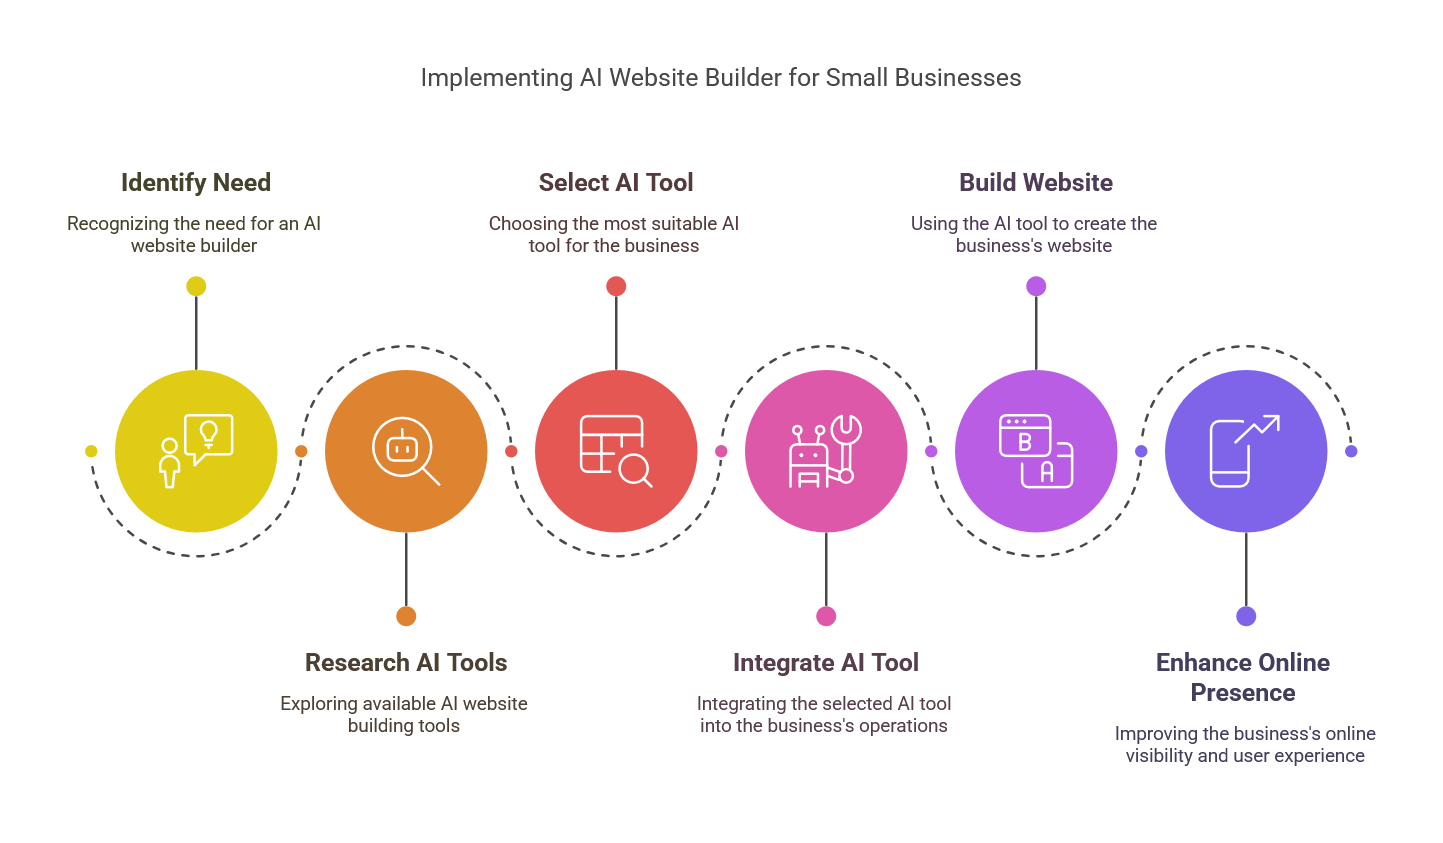
Real-world illustrations often communicate more effectively than theoretical guides. This article explores how small businesses can effectively implement AI website builders through an educational case study...