Colour Grading Premiere Pro: Master Lumetri for Professional Results
Table of Contents
Poor colour in a business video costs you more than you might expect. Viewers form quality judgements within the first few seconds of watching, and flat, inconsistent, or poorly exposed footage signals that a brand has cut corners — regardless of how good the underlying product or service is. For Northern Ireland businesses investing in video marketing, colour grading is the difference between content that builds credibility and content that quietly undermines it.
ProfileTree’s video production team works with SMEs across Belfast and Northern Ireland on exactly this challenge: creating video content that looks intentional, consistent, and professional. Whether your team is producing content in-house or working with a production partner, understanding how colour grading works helps you brief better, spot problems earlier, and hold your video output to a higher standard.
Adobe Premiere Pro’s Lumetri Colour panel is the industry-standard tool for this work. The process has two distinct stages: colour correction removes technical problems like exposure imbalance and incorrect white balance, creating a neutral baseline across all footage; colour grading then applies creative looks and moods that reinforce your brand identity and visual style. This guide covers both, from the basics of the Lumetri panel through to LUT application and colour masking.
Colour Grading Premiere Pro Tutorial
Check out this video below, which takes you through the process of colour grading on Premiere Pro. This will help you visualise what you need to do when it comes to editing your own footage.
What is Colour Grading Premiere Pro?
Colour grading in Adobe Premiere Pro is the process of altering and enhancing the colour of a video or image. It’s an important post-production process that can greatly improve the look and feel of your video.
Here’s a breakdown of what you can do with colour grading in Premiere Pro:
Correcting Colour
This is the first step in colour grading, where you adjust the colours in your footage to make them look more natural. This often involves adjusting the white balance, exposure, contrast, and saturation.
Premiere Pro has several tools for this, including the Lumetri Colour panel, which includes basic correction controls for things like temperature, tint, exposure, contrast, highlights, shadows, whites, blacks, saturation, and vibrance.
Enhancing Colour
Once you’ve corrected the colour, you can enhance it to create a specific look or mood. This might involve increasing the saturation of certain colours, changing the colour of specific areas of the image, or adding a colour tint.
The Lumetri Colour panel also includes creative controls for this process, such as Faded Film, Sharpen, Vibrance, Saturation, and various colour wheels. This feature can dramatically reduce or enhance the colour scheme of your video content.
Using LUTs (Look-Up Tables)
LUTs are files that transform the colours in your video to create a specific look. They’re a quick and easy way to colour grade your footage, especially if you’re not experienced with colour grading. Premiere Pro supports LUTs and includes several preset LUTs that you can use.
Secondary Colour Correction
This is where you adjust a specific range of colours in your footage without affecting the rest of the image. For example, you might want to change the colour of a person’s shirt or the sky. Premiere Pro’s Lumetri Colour panel includes a secondary colour correction section where you can select a colour range and adjust it.
Using Masks
Masks allow you to apply colour corrections to specific areas of your footage. For example, you might want to brighten a person’s face or darken the background. You can create masks in the Lumetri Colour panel and then adjust the colour inside or outside the mask.
Colour grading is a creative process, and the “right” look depends on what you’re trying to achieve. It’s often a good idea to experiment with different settings and techniques to see what works best for your footage.
Is Colour Grading Easy on Premiere Pro?
Adobe Premiere Pro is designed to make colour grading as straightforward as possible, especially with LUTS and the Lumetri Colour. This panel presents colour grading tools in an intuitive way, making it easier for beginners to start learning and applying basic colour corrections and grades.
You also don’t worry about running your work while experimenting with different Premiere Pro tools, as any changes you make in the Lumetri Colour panel are non-destructive, meaning you can always undo them or reset them back to the original if you’re not happy with the result.
However, while the tools are easy to use at a basic level, colour grading is an art form that can take time to master. Achieving a professional look often requires a good understanding of colour theory, lighting, and how different colours and tones interact with each other. It also requires a keen eye for detail and the ability to make subtle adjustments that can greatly enhance the overall look of your footage.
Adobe Premiere Pro Colour Grading Presets
Adobe Premiere Pro colour grading presets are pre-configured effects that you can apply to your footage with just a few clicks. These presets can help you achieve a specific look or style without having to manually adjust all the colour grading settings yourself.
Premiere Pro comes with a variety of built-in colour grading presets, which you can find in the Lumetri Colour panel under the “Creative” section. These presets include various cinematic looks, black and white styles, vintage film looks, and more.
Save Your Own Presets on Premiere Pro
In addition to the built-in presets, you can also create your own colour grading presets. If you’ve adjusted the colour grading settings to create a look that you like, you can save these settings as a preset by clicking on the three-line icon at the top of the Lumetri Colour panel and selecting “Save Preset”.
You can then apply this preset to other clips in your project or in future projects.
Import Custom Grading Presets
You can also download and import colour grading presets created by others. There are many websites and online communities where video editors share their custom Premiere Pro colour grading presets.
Here are some online resources where you can find custom Premiere Pro colour grading presets:
- Motion Array: This site offers a variety of free LUTs and presets for Premiere Pro. They have a wide range of styles, including cinematic looks, Hollywood LUT colour packs, and more.
- Premium Beat: Premium Beat offers free colour grading presets for both Premiere Pro and After Effects. They also provide a tutorial on how to use these presets in your video editing projects.
- Premium Beat – Hollywood Looks: This page offers 14 free Premiere Pro Lumetri Looks that can give your project a cinematic look.
- RocketStock: RocketStock offers 35 free LUTs for colour grading videos in Premiere Pro and other NLEs.
- Wanderlust: This page offers 17 free LUTs designed specifically for LOG footage.
Remember to always check the licensing and usage terms when downloading presets from the internet. Some may be free for personal use, but others may require a licence for commercial use.
How to Apply a Preset?
To apply a colour grading preset, simply select the clip you want to grade in your timeline, then go to the Lumetri Colour panel, select the “Creative” section, and choose a preset from the “Look” dropdown menu. You can then adjust the intensity of the look using the “Intensity” slider.
In-House vs. Professional Colour Grading: A Practical Guide for Belfast SMEs
One of the most common questions Northern Ireland businesses face when planning video content is whether to handle colour grading internally or bring in a professional production team. The honest answer depends on your output volume, brand standards, and the type of content you’re producing.
The table below sets out the main considerations.
Factor In-House Grading Professional Production Upfront cost Software subscription only (Adobe CC) Higher per project, lower long-term for high volume Time investment Significant — grading takes practice to do well Handled by specialists Brand consistency Dependent on individual skill and time available Enforced through production standards Quality ceiling Limited by monitor calibration and editor experience Broadcast-quality output as standard Best suited for Regular social content, internal comms, short-form clips Brand films, client-facing campaigns, product launches When In-House Grading Makes Sense
If you’re producing a high volume of short-form social content — Instagram Reels, LinkedIn updates, behind-the-scenes clips — learning the basics of Lumetri colour correction is a practical investment. The stakes on a 30-second social clip are lower than on a brand film, and the turnaround time rarely allows for an external production workflow.
The key is consistency. Create a saved Lumetri preset that matches your brand’s visual style and apply it as a starting point across all footage. This keeps your content recognisable even when individual clips vary in lighting conditions.
When Professional Grading is Worth the Investment
For any video that will sit on your website, run as paid advertising, or represent your brand at events, professional colour grading is worth the cost. These are the pieces that potential clients will judge you on. A brand film with flat, inconsistent colour tells the viewer something about your attention to detail before you’ve said a word.
Professional grading also matters when you’re shooting across multiple cameras, multiple locations, or multiple days. Matching footage from different sources so that it looks like a cohesive piece is a technical skill that takes time to develop — and mistakes are visible to anyone paying attention.
If you’re unsure which approach suits your current output, ProfileTree’s video production team works with businesses across Northern Ireland to assess what level of production investment makes sense for their goals and budgets.
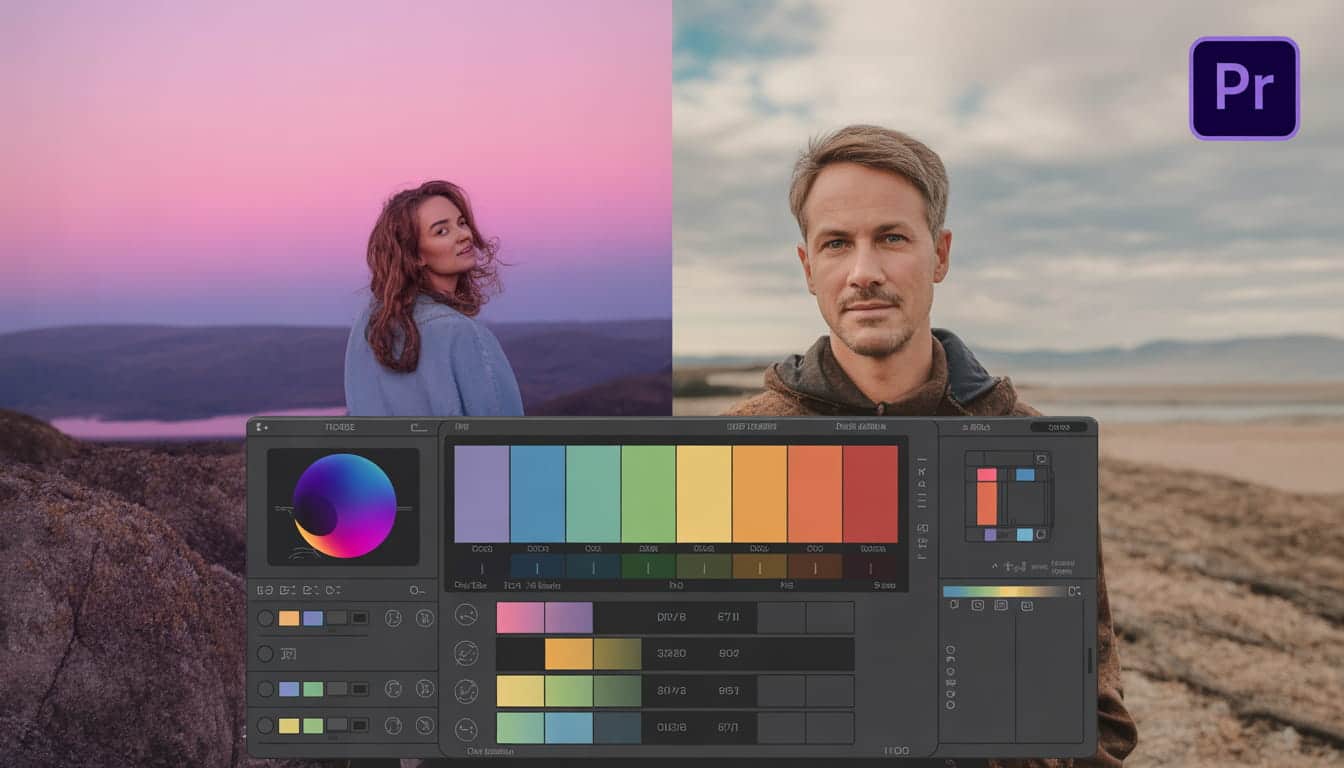
How To Do Colour Grading in Premiere Pro Using The Lumetri Colour Panel

The Lumetri Colour panel in Adobe Premiere Pro is a powerful toolset for colour correction and colour grading. It’s designed to be intuitive and user-friendly, making it accessible for beginners while still offering advanced options for more experienced users.
To use the Lumetri Colour panel, select a clip in your timeline, then go to Window > Lumetri Colour to open the panel. Then, you can adjust the settings in each section to colour grade your footage. Any adjustments you make will be applied to that selected clip.
What Can You Do With the Lumetri Colour Panel?
The Lumetri Colour panel is useful for many different functions in altering the colour of your video footage. Check out all that you can do with the feature below.
Basic Correction
This section is for primary colour correction. Here, you can adjust the white balance, exposure, contrast, highlights, shadows, whites, blacks, saturation, and vibrance of your footage. You can also input a LUT (Look-Up Table) for a quick colour grade.
Creative
This section allows you to apply and adjust creative LUTs, adjust the intensity of the look, and make adjustments to the vibrance, saturation, faded film look, sharpening, and more. It’s designed for stylising your footage and creating a specific look.
Curves
This section allows you to adjust the tonality and colour balance of your footage using curves. There are RGB curves for adjusting the overall contrast and colour balance, and Hue Saturation curves for adjusting the saturation of specific hues.
Colour Wheels & Match
This section provides three colour wheels for adjusting the shadows, midtones, and highlights. It also includes a colour match feature that can automatically match the colour of two shots.
HSL Secondary
This section allows you to select a specific colour or colour range in your footage and apply corrections only to that selection. This is useful for changing the colour of a specific object or area in your footage.
Vignette
This section allows you to add and adjust a vignette effect to your footage.
Many of the colour effects of the Lumetri Colour panel would be familiar to anyone who uses other softwares such as Photoshop and Illustrator. Our recommendation is to play around with all of the tools on the Lumetri Colour panel and gain a real understanding of how they can affect the colour and tone of your video footage.
What is Colour Masking Premiere Pro?
Colour masking in Adobe Premiere Pro is a technique used in colour grading that allows you to isolate a specific colour or colour range in your footage and then apply effects or corrections to only that isolated area. This is particularly useful when you want to change a specific colour in your video without affecting the rest of the image.
How to use Colour Masking in Premiere Pro?
Check out the step-by-step guide on how you can perform colour masking in Premiere Pro:
- Open the Lumetri Colour Panel: This panel is where you’ll find all the colour grading tools in Premiere Pro, including colour masking. You can open it by going to Window > Lumetri Colour.
- Select the Clip: Click on the clip in your timeline that you want to apply the colour mask to.
- Go to the Secondary Colour Correction Section: In the Lumetri Colour panel, scroll down to the “Secondary” section. This is where you’ll find the colour masking tools.
- Use the Eyedropper Tool: Click on the eyedropper tool next to “Set colour”. Then, click on the colour in the Program Monitor that you want to isolate. You can also click and drag to select a range of colours.
- There is also a free drawing option, which is useful if you want to colour mask a whole area as opposed to a certain colour group.
- Refine the Mask: Use the sliders under “Correction Matte” to refine the mask. “Denoise” will smooth out the mask, while “Blur” will blur the edges of the mask.
- Apply Corrections: Once you’ve created the mask, you can apply corrections to the isolated colour using the controls under “Correction”. You can adjust the temperature, tint, tone, saturation, and sharpness of the isolated colour.
- Check the Mask: You can check the mask by clicking the “Colour/Grey” checkbox under “Show Mask”. This will show the isolated colour in colour and everything else in grayscale.
Colour masking is a powerful tool, but it requires a careful touch. It’s easy to go overboard and create unnatural-looking colours, so it’s often best to make subtle adjustments.
Colour Grading in Premiere Pro for Beginners
If you’re a beginner to colour grading in Premiere Pro, then LUTs are going to be your best friend. They can apply a colour theme to your footage without you having to manually adjust each colour preference.
LUTs, or Look-Up Tables, are a type of colour grading tool used in post-production on Premiere Pro. They are essentially a preset that applies a specific colour grade to your footage, and you customise the strength to suit your objective.
LUTs can be used quickly and easily in order to achieve a particular look or style, such as a vintage film look, a high-contrast black and white look, or a cinematic colour grade. They are a great feature that can save you time without compromising on quality.
How to use LUTs in Premiere Pro?
In Adobe Premiere Pro, you can apply LUTs using the Lumetri Colour panel. Here’s how:
- Open the Lumetri Colour Panel: You can open it by going to Window > Lumetri Colour.
- Select the Clip: Click on the clip in your timeline that you want to apply the LUT to.
- Go to the Creative Section: In the Lumetri Colour panel, go to the “Creative” section. This is where you’ll find the controls for applying LUTs.
- Apply a LUT: Click on the drop-down menu next to “Look” and select a LUT from the list. Premiere Pro comes with several built-in LUTs, but you can also import your own.
- Adjust the Intensity: Use the “Intensity” slider to adjust the strength of the LUT. A higher value will make the effect of the LUT more pronounced, while a lower value will make it more subtle.
LUTs can provide a good starting point and can help you achieve professional-looking results quickly and easily. However, it’s also important to learn the basics of colour grading so that you can make more precise adjustments and create your own looks.
Top Tips for Colour Grading Premiere Pro
Colour grading is an essential part of video editing that can greatly enhance the look and feel of your footage. Here are some top tips for colour grading in Adobe Premiere Pro:
Correct Before You Grade
Before you start colour grading, make sure your footage is colour corrected. This means adjusting the exposure, contrast, white balance, and saturation to make the footage look as natural as possible. You can do this in the “Basic Correction” section of the Lumetri Colour panel.
Use the Lumetri Scopes
The Lumetri Scopes provide a visual representation of the colours in your footage. They can help you make more precise adjustments and ensure that your colours are balanced. You can open the Lumetri Scopes by going to Window > Lumetri Scopes.
Start with a LUT
A LUT (Look-Up Table) can provide a good starting point for your colour grade. You can apply a LUT in the “Creative” section of the Lumetri Colour panel, then adjust the intensity to control the strength of the look.
Use Masks for Selective Adjustments
If you want to adjust the colour of a specific area of your footage, you can use a mask. This allows you to apply colour corrections to only the area inside the mask.
Work in the Right Order
When colour grading, it’s generally best to work in the following order: basic correction, creative, curves, colour wheels, HSL secondary, and vignette. This allows you to build up your colour grade in a logical and organised way.
Be Subtle
When it comes to colour grading, less is often more. Subtle adjustments can often have a big impact, while heavy-handed adjustments can make your footage look unnatural.
Keep Consistency
Try to maintain consistency in colour grading across your entire project. This helps to maintain a uniform look and feel.
Save Your Grades as Presets
If you’ve created a look that you like, you can save it as a preset in the Lumetri Colour panel. This allows you to easily apply the same look to other clips or projects.
Learn and Practice
Colour grading is a skill that takes time to learn. Don’t be afraid to experiment with different settings and techniques, and take the time to learn about colour theory and how different colours interact with each other.
Monitor Calibration
Make sure your monitor is correctly calibrated. The colours you see during editing will be the colours you get in the final video. There are various tools available online to help with monitor calibration.
Remember, the goal of colour grading is to enhance the story you’re telling with your footage. Always keep the mood and tone of your story in mind as you grade.
Common Colour Grading Mistakes in Business Video
Most colour grading problems in business video come from the same handful of errors. Knowing what to look for makes a real difference, whether you’re grading footage yourself or reviewing work from an external team.
- Grading before correcting. Jumping straight to creative looks without first correcting exposure and white balance produces inconsistent results. Two clips shot in similar conditions will look completely different after the same LUT is applied if they haven’t been corrected first.
- Over-saturating. This is the most visible sign of an inexperienced grade. Skin tones in particular become unflattering quickly when saturation is pushed too far, and it can make branded colours look garish rather than bold.
- Inconsistency across a series. Businesses producing regular video content often apply different grades to different episodes or clips, meaning a playlist or YouTube channel looks visually inconsistent. Save your grade as a preset and use it as the starting point for all content in a series.
- Ignoring monitor calibration. A grade that looks correct on an uncalibrated monitor can look completely different on a client’s screen or on a mobile device. Basic monitor calibration is a prerequisite for any serious colour work.
Ciaran Connolly, founder of ProfileTree, sees this pattern regularly with businesses starting out in video: “The footage quality is often fine, but the grade gives it away. Either nothing has been done to it, so it looks flat and unfinished, or someone has gone too heavy with the saturation and contrast, and it looks overcooked. A balanced grade that most viewers won’t consciously notice is usually the goal — it just makes everything look like it was meant to look that way.”
Conclusion
Colour grading in Premiere Pro requires understanding the distinction between technical correction and creative grading. Start every project with proper colour correction using Lumetri’s basic correction controls to balance exposure, contrast, and white balance before applying creative grades. This foundation ensures consistent results across all footage and prevents common mistakes like over-saturating poorly exposed clips.
The Lumetri Colour panel’s non-destructive workflow allows experimentation without damaging original footage. LUTs provide quick starting points for specific looks, cinematic, vintage, and high-contrast, but require adjustment to match your specific footage and brand guidelines. Professional results come from understanding colour theory principles and how different tones interact, rather than simply applying presets and hoping for good outcomes.
For Belfast businesses and marketing teams producing regular video content, colour grading skills directly impact perceived production quality and brand credibility. Viewers subconsciously judge content quality within the first few seconds, and professional colour grading signals investment and attention to detail.
ProfileTree’s video marketing services include professional colour grading as part of our complete video production offering, delivering broadcast-quality results for SMEs across Northern Ireland who need professional output without building in-house editing teams.
FAQs
What’s the difference between colour correction and colour grading in Premiere Pro?
Colour correction fixes technical problems like exposure imbalance and white balance issues, creating a neutral baseline. Colour grading applies creative looks and moods after correction is complete, creating specific visual styles that support your storytelling.
Do I need to colour correct before colour grading?
Yes, always. Colour correction creates a consistent baseline across all footage before applying creative grades. Skipping correction leads to inconsistent results and makes achieving a professional look significantly harder.
Can I colour grade directly in Premiere Pro, or do I need DaVinci Resolve?
Premiere Pro’s Lumetri Colour panel handles professional colour grading for most business and marketing videos. DaVinci Resolve offers more advanced node-based grading for high-end film work, but Lumetri provides everything most Belfast businesses and content creators need.
How do I maintain consistent colour across multiple video clips?
Use Premiere Pro’s adjustment layers to apply the same colour grade across multiple clips, or copy and paste Lumetri effects between clips. Creating and saving custom presets ensures brand consistency across video series.
What are LUTs, and should I use them?
Look-Up Tables (LUTs) are preset colour transformations that apply specific looks instantly. They’re helpful starting points but require adjustment for your specific footage. Professional colour grading uses LUTs as foundations, not final solutions.
Discover More About Premiere Pro
Mastering Premiere Pro is a learning curve, requiring a lot of practice and patience. The best way to build expertise is through practice and using the resources available to you.
Transform your workplace culture with ProfileTree. Based in Belfast, we provide digital training, SEO, web design, and AI solutions for Northern Ireland businesses. Our team helps SMEs build better workplace environments through practical training and digital strategies. Get in touch to explore how we can support your business goals.
Check out these articles and develop your expertise as a Premiere Pro wiz: Transitions, Titles and Effects | Colour Grading and Correcting | Using Timeline and Workflow | Video Editing | How to Render and Export | Audio Effects | Video Editing Tutorial.