Audio Effects in Premiere Pro: The Professional Workflow
Table of Contents
Most editors find the audio effects panel in Premiere Pro quickly enough. Locating effects isn’t the hard part. What takes time to learn is the order in which those effects should be applied, and why getting that order wrong can undo hours of careful work. A reverb placed before a compressor, for example, pushes room noise through your dynamics processor and leaves the mix muddy regardless of how much you adjust it afterwards.
This guide focuses on workflow rather than a feature list. It covers the professional signal chain, the effect categories worth understanding in depth, how to process multiple clips at once using the Audio Track Mixer, and how to meet UK broadcast loudness requirements under EBU R128. Whether you’re cutting corporate video, a short documentary, or social media content, the principles apply the same way.
A note on terminology: Adobe Premiere Pro uses “audio effects” and “sound effects” to mean different things. Audio effects are processing tools applied to clips or tracks to shape sound: compression, EQ, reverb, and noise reduction. Sound effects are audio assets (footsteps, ambient noise, music stings) that you add to the timeline. This guide covers audio effects in Premiere Pro: the processing side of the workflow.
ProfileTree’s video production team applies these techniques across client projects throughout Northern Ireland, Ireland, and the UK. If you’d like to develop these skills in-house, our digital training services include practical Premiere Pro courses for marketing teams and content creators.
The Professional Signal Chain: Apply Audio Effects in the Right Order
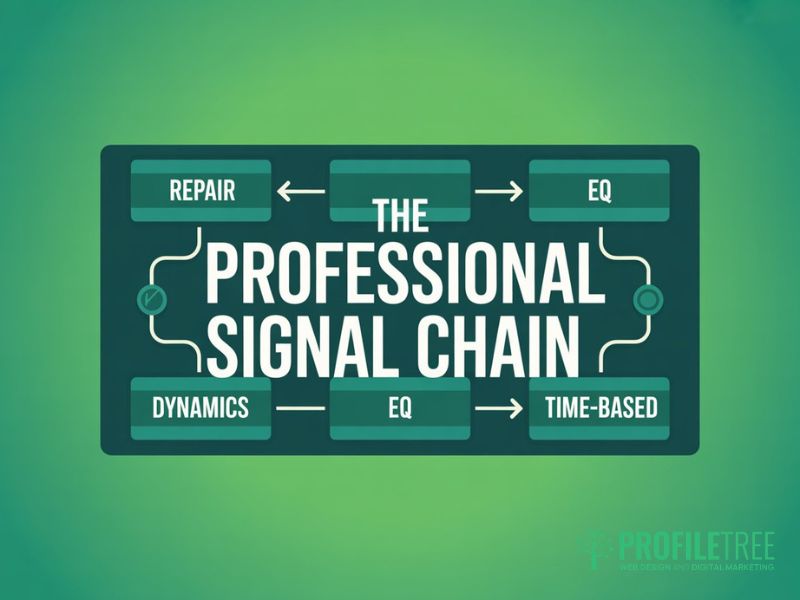
The signal chain is the sequence in which audio effects are applied to a clip or track in Adobe Premiere Pro. Each stage processes the output of the stage before it. When you apply audio effects, Premiere Pro processes them top to bottom in the Effect Controls panel, so order directly determines the result. Apply them in the wrong order and you create problems that later stages can’t correct. It’s the single most important concept for anyone who wants to use audio effects in Premiere Pro at a professional standard.
Step 1: Repair and Restoration
Repair always comes first. Before any dynamics processing or tonal shaping, remove unwanted noise from the raw recording. The DeNoise and DeHum effects in the Noise Reduction/Restoration folder are your starting point for most problem recordings.
DeNoise analyses background noise (ventilation hum, room tone, camera self-noise) and attenuates it across the frequency spectrum. DeHum targets electrical interference at 50 Hz (standard in the UK and Europe) or 60 Hz (used in the US). If you apply either after compression, your compressor will have already reacted to the noise, raising it in level and making it much harder to remove cleanly.
For wind noise or handling noise from a boom microphone, the High Pass Filter in the Filter and EQ folder works better than DeNoise alone. Rolling off everything below 80 Hz removes low-frequency interference without touching the vocal range.
Step 2: Dynamics and Levelling
Once the audio is clean, manage its dynamic range. Compression reduces the difference between the quietest and loudest parts of a recording, making it easier to set a consistent level across the whole clip. The Dynamics effect in Premiere Pro combines a compressor, expander, limiter, and gate in one panel.
For dialogue, a ratio of 3:1 to 4:1 with a medium attack of around 10ms and a fast release preserves the natural quality of speech while controlling peaks. Over-compressing dialogue for social media is one of the most common mistakes in amateur video editing: it flattens vocal character and makes the speaker sound processed. Use compression to control, not to squash.
A note on gain staging: the compressor works correctly only when the input level is set properly. If your dialogue is peaking well below 0 dBFS on the waveform, apply clip gain first by right-clicking the clip in the timeline and selecting Audio Gain. This brings the level up before the compressor processes it. Clip gain isn’t the same as the volume fader; gain staging happens before effects processing, not after.
Step 3: Tonal Shaping with EQ
Equalization shapes the frequency content of your audio after the dynamics have been controlled. The Parametric Equaliser in Premiere Pro gives you up to five bands with independent control over frequency, gain, and bandwidth (Q). It’s the most important EQ tool in the effects library for professional audio work.
For dialogue, a gentle high-pass filter at around 80 Hz removes residual low-frequency content that the earlier filter may not have fully caught. A small boost between 2 kHz and 5 kHz adds presence and clarity. If the recording sounds boxy or nasal, a cut between 200 Hz and 400 Hz usually improves it.
EQ decisions should always be made with the full mix playing, not a clip in isolation. A frequency that sounds thin on its own may sit perfectly well in context. The Essential Sound panel’s Enhance Speech preset applies an automatic version of this process and is a useful starting point, but always finish the mix manually using the Parametric Equaliser rather than relying on automatic matching.
Step 4: Time-Based Sound Effects
Reverb and delay are the time-based sound effects in Premiere Pro, and they’re applied last because they act on the already-processed signal. Adding reverb to a raw, uncompressed recording makes noise reverberant and almost impossible to remove; applying it after compression and EQ gives you control over the result.
The Reverb effect in Premiere Pro includes presets for different acoustic environments: rooms, halls, and plates. For documentary or corporate video, a small room preset keeps the audio grounded and natural. For music or creative work, larger space presets add dimension and atmosphere.
The Analogue Delay effect gives warm, musical echo, while Multitap Delay allows more complex layered patterns. For most dialogue-led content, delay has limited application. For music-driven sequences or creative sound design, it adds depth that reverb alone can’t produce.
Signal Chain at a Glance
| Stage | Effect to Use | Purpose |
|---|---|---|
| 1: Repair | DeNoise, DeHum, High Pass Filter | Remove noise before dynamics processing |
| 2: Dynamics | Dynamics (Compressor/Limiter) | Control dynamic range and peaks |
| 3: Tonal Shaping | Parametric Equaliser | Shape frequency content |
| 4: Time-Based | Reverb, Delay | Add space, depth, or creative texture |
Where to Find Audio Effects in Premiere Pro
Before applying any processing, you need to know where sound effects and audio effects live in the interface. Premiere Pro organises them across several panels, and knowing which panel to use for which task saves time on every edit.
The Effects Panel
The Effects panel (Window > Effects) is the primary location for all Premiere Pro audio effects. Open the Audio Effects folder, and you’ll find every processing tool organised into subfolders by category: Amplitude and Compression, Delay and Echo, Filter and EQ, Modulation, Noise Reduction/Restoration, Reverb, Special, Stereo Imagery, and Time and Pitch. To apply an effect, drag it from the Effects panel directly onto a clip in the timeline or onto a track in the Audio Track Mixer.
Premiere Pro audio effects can also be previewed before applying them. Right-click any effect in the Effects panel and choose Apply Effect to get a quick preview on the selected clip. For effects you use regularly, right-click and select Add to Preset Bin to save your adjusted settings as a reusable preset. It’s particularly useful for effects chains you apply consistently across projects.
You can also search for effects by name using the search bar at the top of the Effects panel. Typing “compressor” or “reverb” filters the list immediately. It’s faster than navigating subfolders when you know what you need.
The Essential Sound Panel
The Essential Sound panel (Window > Essential Sound) provides a simplified interface for applying Premiere Pro audio effects without navigating the full Effects panel. Tag your audio as Dialogue, Music, Sound Effects, or Ambience, and the panel presents relevant controls and presets for each category. Dialogue tags reveal sliders for noise reduction, compression, and EQ. Sound Effects tags offer loudness controls and reverb options.
The Essential Sound panel works well for quick edits and less experienced editors. For professional delivery or complex audio problems, manual control via the Effects panel and the Parametric Equaliser gives better results. Use the Essential Sound panel to get close, then refine with individual effects.
The Effect Controls Panel
Once you apply an audio effect to a clip, its parameters appear in the Effect Controls panel (Window > Effect Controls). That’s where you adjust settings: threshold, ratio, attack, and release for a compressor; frequency, gain, and Q for an EQ band; decay time and room size for reverb. Each effect can also be bypassed here using the FX toggle, which lets you compare the processed and unprocessed signal in real time.
Essential Audio Effects Categories in Premiere Pro
Premiere Pro’s audio effects library is organised into folders within the Effects panel. Understanding what each category does, rather than working through them one by one, means you reach for the right tool faster when you’re under time pressure. The following categories are the ones used most frequently in professional video editing workflows.
Amplitude and Compression
This folder contains the tools that manage loudness and dynamic range. Hard Limiter prevents the signal from exceeding a set ceiling, which is essential before export to prevent clipping. Multiband Compressor divides the audio into frequency bands and applies independent compression to each, giving you finer control than a broadband compressor. It’s particularly useful for voice-over work where the low-mid range tends to build up over a sustained delivery. Single Band Compressor is a simpler option for dialogue where broad dynamic control is all you need.
Filter and EQ
The Filter and EQ folder contains the Parametric Equaliser (five fully adjustable bands), the Graphic Equaliser (31-band fixed-frequency control), and several single-function filters, including the High Pass Filter and Low Pass Filter. The Notch Filter targets a very narrow frequency range and is useful for removing a specific tonal problem that DeHum hasn’t caught. The Parametric Equaliser is the primary EQ tool for professional audio work in Premiere Pro; the Graphic Equaliser is better suited to broad tonal adjustments on music tracks.
Noise Reduction and Restoration
This is the most practically useful folder for footage recorded on location. DeNoise handles broadband background noise; DeHum handles electrical interference. The Declip effect attempts to repair audio that was recorded too hot and has distorted peaks. It works on mild clipping and isn’t a replacement for re-recording severely distorted audio. These three tools are the foundation of any repair workflow when using audio effects in Premiere Pro on real-world footage.
Reverb and Delay
Reverb and delay are the time-based audio effects in Premiere Pro used to place audio in a space or create rhythmic repetitions. The Reverb effect includes presets for room types and acoustic environments. Studio Reverb gives clean, controllable room ambience. Convolution Reverb uses impulse responses to simulate real spaces accurately, though it’s more CPU-intensive. Delay effects include Analog Delay, Multitap Delay, and the simpler Echo effect for creative sound design work.
Audio Effects in Premiere Pro: Effect Selection Reference
| The Problem | Effect to Use | Essential Sound Equivalent |
|---|---|---|
| Background hiss or room noise | DeNoise | Reduce Noise slider (Dialogue) |
| Electrical hum (50/60 Hz) | DeHum | Reduce Rumble slider |
| Loud peaks or inconsistent levels | Dynamics (Compressor) | Loudness > Auto-Match, then refine manually |
| Harsh sibilance (“S” sounds) | Parametric EQ: cut at 6–8 kHz | No direct equivalent (manual EQ required) |
| Quiet or thin dialogue | Parametric EQ: boost 2–5 kHz; clip gain first | Enhance Speech preset |
| Wind or handling noise | High Pass Filter: roll off below 80 Hz | Reduce Rumble slider |
| Room ambience or atmosphere | Reverb (Studio Reverb or Convolution) | Reverb slider (Sound Effects tag) |
| Distorted/clipped recording | Declip effect | No direct equivalent |
How to Add Sound Effects in Premiere Pro
Adding sound effects in Premiere Pro (ambient audio, music, foley, and production sound elements) follows a straightforward process. This section covers the workflow for importing, placing, and mixing sound effects alongside your edited footage.
Importing and Organising Sound Files
Import audio files through File > Import or by dragging them into the Project panel from your file browser. Create dedicated bins in the Project panel for different audio categories: dialogue, music, ambient sound, and sound effects. Keeping these separate makes it easier to manage layers as your sequence grows.
Premiere Pro supports all common audio formats, including WAV, AIFF, MP3, and AAC. For professional work, use WAV or AIFF files at 48 kHz / 24-bit, which match broadcast delivery requirements and give the processing chain more headroom to work with than compressed formats.
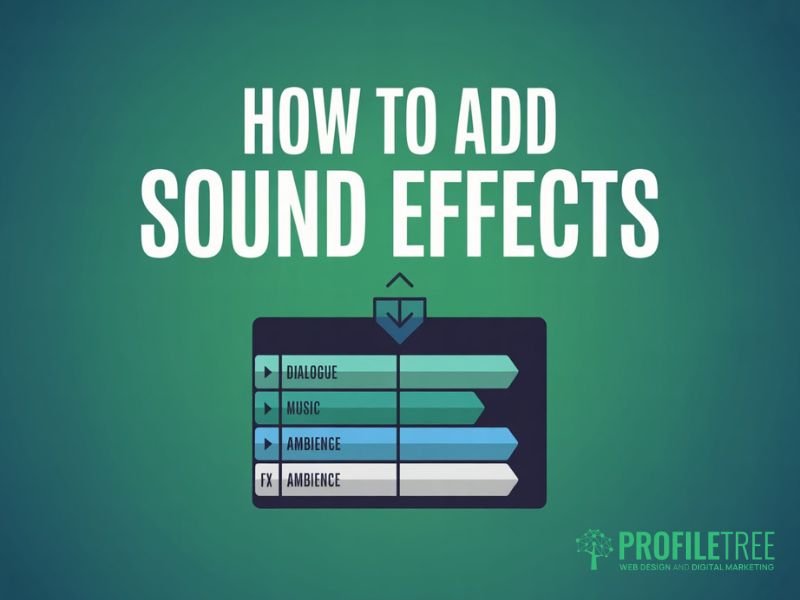
Placing Sound Effects on the Timeline
Drag audio clips from the Project panel onto audio tracks in the timeline. Place Premiere Pro sound effects on separate tracks from dialogue and music so you can process and level them independently. A typical arrangement for a short video would be: A1 for dialogue, A2 for music, A3 for ambient sound, and A4 for spot sound effects. Premiere Pro sound effects tracks benefit from their own processing chain in the Audio Track Mixer, separate from dialogue, so you can control ambience levels and spot effects independently. When you’ve got many Premiere Pro sound effects across multiple tracks, group them to a submix track so you can manage the overall level and apply shared processing in one place.
To add sound effects in Premiere Pro from the built-in library, open the Essential Sound panel and browse the available assets under the Sound category. Adobe’s built-in sound effects library includes several hundred production-ready clips organised by type. You can also use Adobe Audition’s sound effects library if Audition is installed as part of your Creative Cloud subscription.
For sound effects that Premiere Pro doesn’t include by default, you can import any WAV, AIFF, or MP3 file from a third-party library or your own recordings. Royalty-free sound effects Premiere Pro editors commonly use include BBC Sound Effects, Freesound, and Adobe’s own Stock Audio. For professional work, the sound effects Premiere Pro accepts should be WAV files at 48 kHz/24-bit to match broadcast delivery requirements. Check licence terms before using any third-party library commercially.
Adjusting Levels and Panning
Once your sound effects are on the timeline, set levels using the rubber band (the thin horizontal line on the audio clip in the timeline). Click and drag it up or down to adjust the clip’s volume. For finer control, use keyframes: click the pen tool, then click on the rubber band at two points to create a fade in or out. Right-clicking a clip and selecting Audio Gain opens a dialogue for precise gain adjustment in dB.
Panning controls the left-right position of a sound in the stereo field. Double-click a clip to open its settings in the Effect Controls panel and adjust the Channel Volume or Panner parameters. Panning is a standard technique with sound effects Premiere Pro editors use to place elements in the stereo field, matching the screen position of objects: a door closing on the left, a car passing right.
Batch Processing Audio Effects with the Audio Track Mixer
Applying audio effects in Premiere Pro clip by clip works for short edits, but becomes unmanageable on longer sequences with many audio layers. The Audio Track Mixer solves this by letting you apply effects to an entire track at once, so every clip routed to that track receives identical processing without individual adjustment.
Open the Audio Track Mixer from Window > Audio Track Mixer. Each channel strip represents one audio track in your timeline. The top section of each strip contains an effects rack that works identically to the Effect Controls panel for individual clips; drag effects from the Effects panel into the rack, and they process every clip on that track.
Setting Up a Track-Level Processing Chain
A practical workflow for multi-clip sequences: route all dialogue clips to a single audio track, apply your processing chain (DeNoise > Compressor > EQ) at the track level in the Audio Track Mixer, then use the Effect Controls panel only for clip-specific adjustments. If one clip was recorded in a noticeably different environment, you can add a clip-level effect on top of the track processing without disrupting the rest of the sequence.
For sequences with multiple audio layers (dialogue, music, ambient sound, and sound effects in Premiere Pro), use audio submix tracks to group similar elements. Route all dialogue tracks to a Dialogue submix, apply the dialogue processing chain there, and blend the submix with music and sound effects at the master track level. It’s the standard approach in professional broadcast post-production and gives you clean, organised control over the full mix.
Paste Attributes for Quick Multi-Clip Processing
For shorter sequences or one-off projects, Paste Attributes transfers all effects settings from one clip to many in a single action. Process one clip fully, copy it, select the remaining target clips, right-click and choose Paste Attributes, then tick Audio Effects. This copies all applied effects and their settings to every selected clip simultaneously. Note that Paste Attributes creates independent copies; adjusting the original clip later doesn’t update the clips it was pasted to.
Both the Audio Track Mixer method and Paste Attributes are used regularly in production work. The track mixer is better for ongoing projects where you add new clips regularly; Paste Attributes is faster for a defined batch of clips that all need the same treatment. ProfileTree’s video marketing team uses both approaches depending on the scale and structure of the project.
Meeting UK Broadcast Loudness Standards: EBU R128
Loudness normalisation is the final step in any professional audio workflow using Premiere Pro, and the most frequently skipped. Without it, your content may be automatically lowered in level by streaming platforms and broadcast systems, or sound inconsistently loud compared to other content on the same channel.
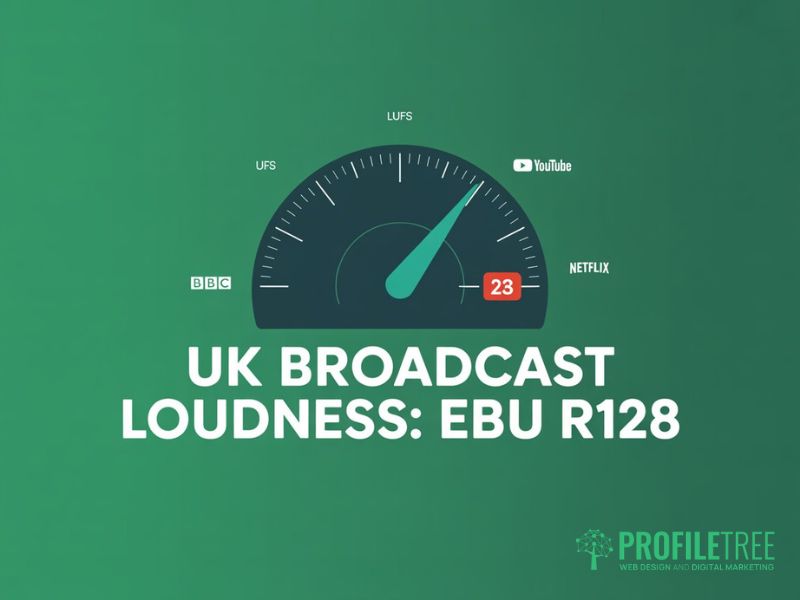
What EBU R128 Requires
EBU R128 is the European loudness standard adopted by the BBC and most UK and Irish broadcasters. It measures integrated loudness in LUFS (Loudness Units Full Scale) rather than peak level in dBFS. The target for UK broadcast delivery is -23 LUFS with a maximum true peak of -1 dBTP. YouTube normalises to approximately -14 LUFS. Spotify and most podcast platforms also target -14 LUFS. Netflix requires -27 LUFS.
The distinction between loudness normalisation and hard limiting matters. Normalisation adjusts the overall level of the mix to reach the target; limiting prevents any individual peak from exceeding the maximum true peak ceiling. Both are required for broadcast delivery. Normalising to -23 LUFS without a true peak limiter set at -1 dBTP can result in peaks that distort during codec conversion, which is a common problem with the compressed formats used in streaming.
Using the Loudness Radar in Premiere Pro
Premiere Pro’s Loudness Radar (found under the Special folder in the Audio Effects panel) gives a real-time visual display of integrated loudness, loudness range, and momentary loudness as the timeline plays. Apply it to the master track in the Audio Track Mixer so it measures the full mix output.
The Radar defaults to -23 LUFS for broadcast. Audio plotted within the inner ring is within spec. Use it together with the Hard Limiter on the master track, set to a maximum amplitude of -1 dB, preventing peaks from breaching the true peak ceiling.
For social media delivery, change the Radar target to -14 LUFS and adjust the Hard Limiter ceiling to -1 dBTP. The workflow is the same; only the target value changes. If you’re delivering to both broadcast and social media from the same project, export two separate mixes with different loudness settings rather than compromising between them.
Platform Loudness Reference for Premiere Pro Audio Delivery
| Platform | Target LUFS | Max True Peak |
|---|---|---|
| UK/Irish Broadcast (EBU R128) | -23 LUFS | -1 dBTP |
| YouTube | -14 LUFS | -1 dBTP |
| Spotify / Podcast Platforms | -14 LUFS | -1 dBTP |
| Netflix | -27 LUFS | -2 dBTP |
| Facebook / Instagram | -14 LUFS | -1 dBTP |
If you need video content that meets broadcast or platform delivery specifications, ProfileTree’s video production services include full audio post-production and loudness mastering for UK broadcast and social media delivery.
Troubleshooting Audio Effects in Premiere Pro
When a Premiere Pro audio effect appears applied but produces no audible result, the problem is almost always one of the following. These troubleshooting steps cover the most common reasons audio effects Premiere Pro editors encounter when effects fail to produce results. Understanding audio effects Premiere Pro applies by default versus those you add manually is also important: some tracks have built-in processing that can interfere with effects you add in the Effect Controls panel. Work through this list before assuming the effect itself is at fault.
- Track or clip is muted. Check the M button on the track header in the timeline and in the Audio Track Mixer. A muted track bypasses all processing.
- The effect has been bypassed. Every effect in the Effect Controls panel has a small fx toggle. If it’s greyed out or struck through, click it to re-enable the effect.
- Output routing is incorrect. If you applied effects to a submix track but the audio isn’t routed through it, those effects won’t be heard. Check the Output field at the bottom of each channel strip in the Audio Track Mixer.
- Clip gain is too low before the effect. Some audio effects in Premiere Pro, particularly compressors and limiters, only process the signal above a set threshold. If the incoming signal is very quiet, the effect may trigger nothing at all. Raise the clip gain first.
- VST plugin not recognised. If third-party VST plugins aren’t appearing in the effects list, go to Preferences > Audio > Audio Plug-In Manager and run a scan. Premiere Pro doesn’t automatically detect newly installed VSTs.
- Sample rate mismatch. If a sound effects clip was recorded at a different sample rate from your sequence (for example, 44.1 kHz audio in a 48 kHz sequence), Premiere Pro will resample it automatically, but this can occasionally cause unexpected behaviour with certain effects. Check the clip properties in the Project panel and confirm the sequence settings match your primary audio.
Pre-Export Audio Audit: Five-Point Checklist
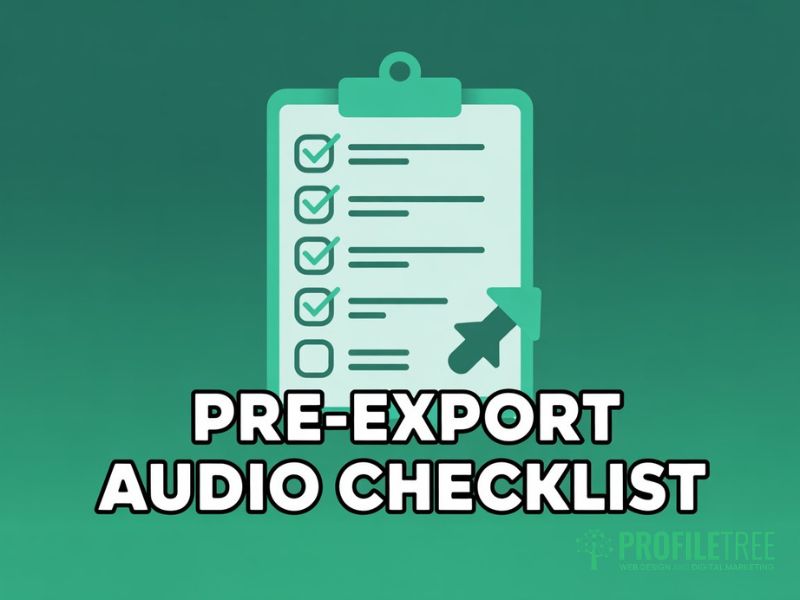
Run these checks on every Adobe Premiere Pro project before committing to export. They take less than five minutes and prevent the most common audio delivery problems.
- No clipping. Waveforms shouldn’t be flattened at the top of the clip, and the master output meter shouldn’t hit 0 dBFS at any point during playback. If it doesn’t, lower the master fader or add a Hard Limiter on the master track.
- Peaks at or below -3 dBFS. Leave headroom before export to prevent distortion during codec conversion. Check the level meter during the loudest section of your sequence.
- Noise floor is silent. Play back a section with no intentional audio (a pause between lines of dialogue, for example). Background noise shouldn’t be audible at -60 dBFS or above. If it doesn’t, revisit your DeNoise settings.
- Mono and stereo compatibility. Temporarily pan your full mix to mono and listen. If elements disappear or sound noticeably thinner, there’s phase cancellation between stereo channels, often caused by reverb or stereo widening effects. Adjust or remove the offending effect.
- Loudness within the target. Check the Loudness Radar reading before export and confirm it matches the target for your delivery platform. Refer to the platform loudness reference table in the EBU R128 section above.
Next Steps
The difference between acceptable audio and professional audio in Premiere Pro is mostly a workflow difference, not a tools difference. The audio effects are all there in the Effects panel; what changes results is knowing the correct order to apply them and having a loudness target (EBU R128 at -23 LUFS for UK broadcast, -14 LUFS for social media) to check against before export.
Apply the signal chain consistently on every project (repair, then dynamics, then EQ, then time-based effects), and the process becomes fast and repeatable. The same applies to sound effects: Premiere Pro gives you everything needed to mix dialogue, music, and Premiere Pro sound effects to broadcast standard without leaving the application. For businesses and marketing teams who’d like to build these skills in-house, ProfileTree’s digital training services include practical video editing and audio post-production courses tailored to the needs of organisations across Northern Ireland, Ireland, and the UK.
FAQs
1. Where are audio effects in Premiere Pro?
Audio effects in Premiere Pro are found in the Effects panel (Window > Effects), inside the Audio Effects folder. They are organised into subfolders by category: Amplitude and Compression, Delay and Echo, Filter and EQ, Modulation, Noise Reduction/Restoration, Reverb, Special, Stereo Imagery, and Time and Pitch. You’ll find Premiere Pro audio effects by searching at the top of the Effects panel. You can also access a simplified selection of audio effects Premiere Pro editors use most through the Essential Sound panel (Window > Essential Sound), which presents preset-based controls without navigating the full library.
2. How do I apply audio effects to multiple clips in Premiere Pro?
The most efficient method is to apply effects at the track level using the Audio Track Mixer (Window > Audio Track Mixer). Effects placed in a track’s rack apply automatically to every clip on that track. For a one-off batch, use Paste Attributes: fully process one clip, copy it, select all target clips, right-click and choose Paste Attributes, then tick Audio Effects. This copies all effect settings simultaneously. The Audio Track Mixer is better for ongoing sequences where you’re still adding clips; Paste Attributes is faster for a fixed batch.
3. What are the best audio effects for voice-over in Premiere Pro?
For voice-over, start with DeNoise (if the recording has background noise), then apply the Dynamics effect to control peaks, followed by the Parametric Equaliser for tonal shaping. This three-stage chain of audio effects Premiere Pro editors rely on addresses the most common voice-over problems: noise, inconsistent levels, and thin or muddy tone. Premiere Pro audio effects presets in the Essential Sound panel (Enhance Speech) apply a version of this processing automatically and are a useful starting point. For professional delivery, always refine manually using the Parametric Equaliser after running the Essential Sound preset.
4. What is the UK broadcast standard for audio in Premiere Pro?
UK and Irish broadcasters follow EBU R128, which targets an integrated loudness of -23 LUFS with a maximum true peak of -1 dBTP. Apply the Loudness Radar effect (in the Special folder in Audio Effects) to the master track in the Audio Track Mixer to monitor your levels against this standard in real time. Add a Hard Limiter on the master track set to -1 dB maximum amplitude to prevent peaks from exceeding the true peak ceiling. For YouTube and social media, the target changes to -14 LUFS; export separate mixes if you’re delivering to both broadcast and social media.
5. Does Adobe Premiere Pro have sound effects built in?
Yes. Adobe Premiere Pro includes a built-in sound effects library accessible through the Essential Sound panel and, for Creative Cloud subscribers, through Adobe Stock Audio. The Essential Sound panel’s Sound Effects tag provides browse and search access to production-ready Premiere Pro sound effects, including ambiences, foley, and music stings. Adobe Audition’s more extensive library is also accessible if installed as part of your Creative Cloud plan. The audio effects processing tools (compression, EQ, reverb, noise reduction) are in the Effects panel under Audio Effects and are available on all subscription tiers. Unlike sound effects Premiere Pro editors import as assets, these processing tools apply directly to the audio you’ve already placed on the timeline.