Premiere Pro Editing Tutorial: Business Video Made Practical
Table of Contents
Most businesses sitting on a backlog of unedited footage have the same problem: the skills gap between recording something decent and producing something publishable feels enormous. Adobe Premiere Pro is the professional standard for video editing, used by marketing teams, content creators, and production houses across the UK and Ireland — but most tutorials assume you are training to be a filmmaker, not a marketing manager trying to get product videos live by Thursday.
This guide takes a different approach. It covers the Premiere Pro editing fundamentals you actually need for business video: how the workspace is set up, how to organise your files, how to cut and sync a timeline, and how to export correctly for YouTube, LinkedIn, and your website. If you reach the end and decide you would rather have a professional handle it, that option is here, too.
Premiere Pro Editing for Business
Premiere Pro sits at the professional end of the market for good reason. It handles every format a UK business is likely to shoot, integrates directly with Adobe After Effects for motion graphics, and its timeline structure scales from a 60-second social clip to a 20-minute brand documentary without changing your workflow.
For marketing teams, the practical advantages are consistency and output quality. Footage edited in Premiere Pro looks different from footage cut in a free mobile app — and that difference registers with viewers even when they cannot articulate why. If your business is producing video for client-facing content, product demonstrations, or your YouTube channel, the investment in learning Premiere Pro pays back across every piece of content you produce.
Free and entry-level tools have their place. Canva’s video editor is fine for static text-on-screen social posts. CapCut is fast for short-form content. But neither gives you the control over audio, colour, or export quality that matters when the video represents your brand.
Getting Started: Workspace and Project Setup
You need an Adobe account to access Premiere Pro, either through the full Creative Cloud subscription or a standalone Premiere Pro plan. Open the application, and you will land on the Start screen, which gives you the option to create a new project, open an existing one, or start a team project.
Click ‘New Project’. A settings window opens with a large number of options. Name your project clearly — use the client name, campaign, or date reference that will make sense when you come back to it in three months. Leave all other settings at their defaults for now, except one: the rendering device. If your machine has a dedicated graphics card, select it here. If not, the CPU setting works fine.
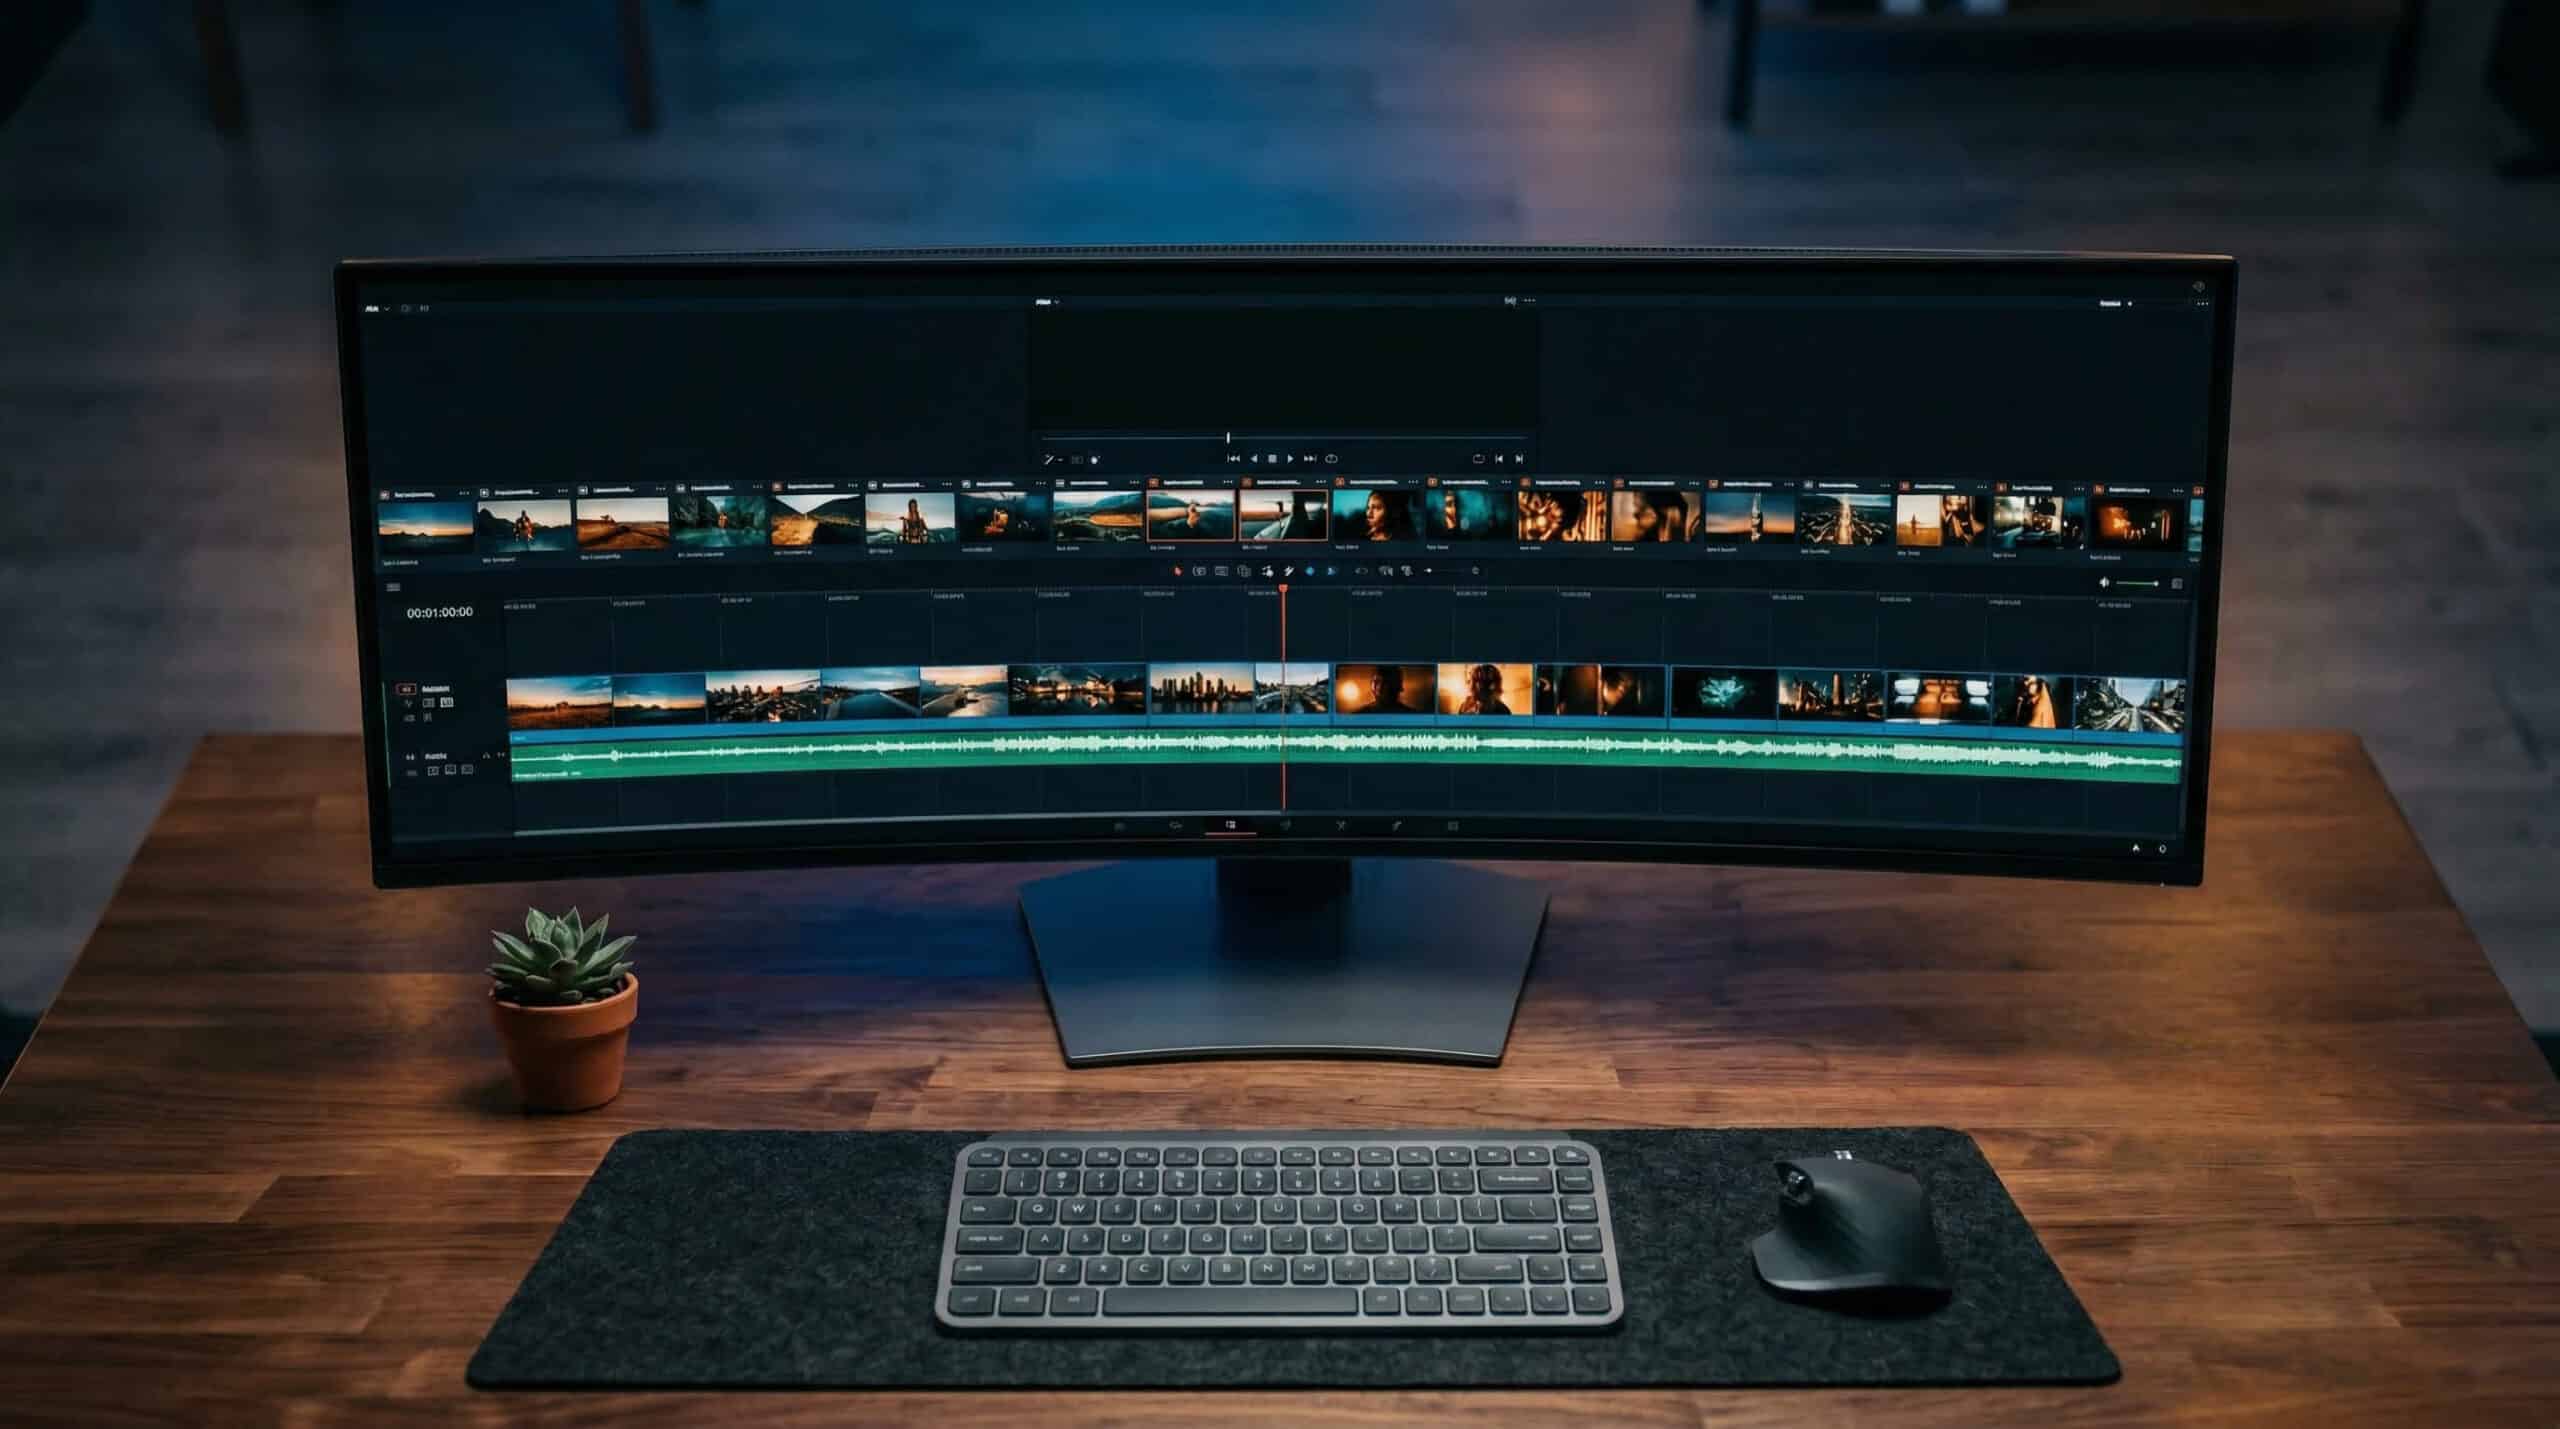
Click OK. The Premiere Pro workspace opens. At first glance, it is busy, but it is organised around four main panels: Source (for previewing individual clips), Program (your edited timeline preview), Project (your media library), and Timeline (where the edit happens). You can reposition any panel to suit how you work; most editors move the Project panel to the bottom left to keep it visible alongside the timeline.
Importing Media and Organising with Bins
The Project panel is where your imported media lives. Right-click anywhere inside it and select ‘Import’. Your file browser opens. Navigate to your footage, select single files, multiple files at once, or an entire folder, and confirm. Your footage now appears in the Project panel.
If you import a folder, Premiere Pro creates a bin — essentially a folder within your project — automatically. Bins are one of Premiere Pro’s most useful organisational tools and are worth setting up deliberately before your edit grows unwieldy. Right-click in the Project panel, select ‘New Bin’, and name it. Common bin structures for business video include separate bins for raw footage, audio (music and voice recordings), graphics, and project outputs.
This matters more than it sounds. A 10-minute brand film might involve 40 or 50 individual clips, multiple audio tracks, and several graphic files. Without bins, the Project panel becomes a scroll-through nightmare. With them, you can find anything in seconds.
Timelines, Sequences, and Making Your First Cut
A sequence is where your edit lives. To create one, go to File > New > Sequence, or use the keyboard shortcut Ctrl+N (Cmd+N on Mac). The New Sequence window opens.
The first step is selecting the right preset. This should match the camera settings you filmed with. Most UK business footage is shot on a DSLR or mirrorless camera at 25 frames per second (the European broadcast standard, as opposed to 24fps, which is more common in US productions). Check your camera settings if you are unsure — selecting the wrong frame rate creates a sequence where your footage drops frames or judders during playback.
Name your sequence and click OK. Your timeline appears. You will see a series of horizontal tracks: video tracks (labelled V1, V2, V3) run along the top half; audio tracks (A1, A2, A3) run below. The blue vertical line is your playhead — it shows where you are in the timeline.
To add a clip, drag it from the Project panel directly onto the timeline. It lands on V1 and A1 by default. To make a cut, position your playhead at the point where you want to cut, then press C to switch to the Razor Tool, click on the clip at that point, and press V to return to the Selection Tool. You can now drag either half of the clip independently or delete the section you don’t want.
The keyboard shortcut for deleting a section and closing the gap is Shift+Delete. This is one of the most-used shortcuts in Premiere Pro and is worth committing to muscle memory early.
Syncing Audio in Premiere Pro
Most business video is shot with a camera, a microphone, and a separate audio recorder — a lapel mic or a small field recorder placed close to the speaker. The separate audio is almost always better quality than the in-camera track. Syncing them correctly is an essential part of business video production.
Import your audio file into Premiere Pro the same way you import footage. Drag it onto the timeline on a separate audio track below your video clip.
To sync, find the clap or clapperboard spike in both waveforms — the sharp vertical peak is easy to spot. Zoom into the timeline using the plus key to see the waveforms in detail. Drag the separate audio track left or right until the spikes align.
For more precise syncing, right-click on the timeline and select ‘Show Audio Time Units’. This switches the timeline ruler from frames to audio samples, giving you finer control.
Once synced, you can remove the in-camera audio. Right-click on the video clip and select ‘Unlink’. This detaches the video track from its associated audio track. Click on the in-camera audio track and delete it. Then shift-click both your video track and the separate audio track, right-click, and select ‘Link’ to tie them back together as a single unit. This keeps them moving together if you drag or reposition the clip.
For teams working across multiple cameras, Premiere Pro’s auto-sync feature (Clip > Merge Clips > Synchronise using Audio) can match multiple clips automatically. It is not perfect, but it gets close enough to use as a starting point.
Export Settings for YouTube and Social Media
Getting the export settings right is where many first-time editors lose time. Premiere Pro’s export dialogue has hundreds of options; most of them don’t matter for standard business video.
Go to File > Export > Media (or Ctrl+M / Cmd+M). The Export Settings dialogue opens.
For YouTube, use these settings:
- Format: H.264
- Preset: YouTube 1080p Full HD
- Resolution: 1920 x 1080
- Frame rate: match your sequence (25fps for most UK footage)
- Bitrate encoding: VBR, 2 pass
- Target bitrate: 16 Mbps
For LinkedIn, the same H.264 settings work well. LinkedIn compresses uploaded video heavily, so a higher source bitrate gives you more headroom before quality degrades.
For Instagram Reels or TikTok, switch to 1080 x 1920 (vertical) and reduce the bitrate target to 10–12 Mbps. The platforms recompress on upload regardless, so there is no value in exporting at very high bitrates for vertical social content.
One setting to turn on regardless of platform: export ‘Use Maximum Render Quality’ in the Video tab. It adds export time but produces noticeably better results when footage has been scaled, repositioned, or colour corrected.
| Platform | Format | Resolution | Frame Rate | Target Bitrate |
|---|---|---|---|---|
| YouTube | H.264 | 1920×1080 | 25fps | 16 Mbps |
| H.264 | 1920×1080 | 25fps | 16 Mbps | |
| Instagram Reels | H.264 | 1080×1920 | 25fps | 10–12 Mbps |
| Website (embedded) | H.264 | 1920×1080 | 25fps | 8–10 Mbps |
Premiere Pro’s AI Features: What They Do and What They Don’t
Adobe has added a number of AI-assisted tools to Premiere Pro through its Sensei and Firefly integrations. For business video teams, three are worth knowing.
Auto Reframe automatically crops and repositions landscape footage into vertical or square formats. It uses motion tracking to keep the subject centred. It is not flawless — fast movement or crowded shots can confuse it — but it saves significant time when you need to repurpose a single interview or product demo across multiple aspect ratios.
Speech to Text generates automatic captions from your audio track. Accuracy varies with recording quality and accent, but for clean audio, it is fast enough to be useful as a starting point. Captions are increasingly important for social video in the UK; a significant proportion of LinkedIn video is watched without sound.
Scene Edit Detection analyses a piece of finished video and automatically identifies cut points. This is most useful when you have a rendered video that needs re-editing, but you no longer have the original project file.
None of these replaces editorial judgement. They are time-saving tools, not decision-making tools.
In-House Editing vs. Professional Video Production
The honest answer is that most UK businesses should be doing both, for different types of content.
In-house editing makes sense for regular, lower-stakes content: interview clips for social media, product update videos, webinar recordings, and testimonials. Premiere Pro is the right tool for this work, and a marketing team member with 20–30 hours of practice can produce publishable results for these formats.
Professional video production makes sense for brand films, campaign hero videos, product launches, case study videos, and any content where production quality directly affects the result. A poorly lit or badly edited brand film communicates something about your business that takes a long time to undo. The cost of professional production is not just about access to better equipment; it is about the experience, editorial direction, and technical execution that come with a team that does this every day.
ProfileTree’s video production team works with businesses across Northern Ireland, Ireland, and the UK on exactly this mix. Some clients come to us for a single brand film and handle their own day-to-day social content. Others bring us in for strategy and production across a full campaign while their team manages distribution and repurposing. The right structure depends on your output volume, budget, and internal capacity.
For teams that want to bring more editing in-house without getting it wrong, ProfileTree’s digital training programmes cover video production and editing as part of a broader digital skills curriculum. Training is delivered as structured workshops, not generic online modules, and is designed around the specific tools and workflows your team will actually use.
Summary: Your Next Steps with Premiere Pro
Premiere Pro has a steeper learning curve than consumer editing tools, but the fundamentals covered here, project setup, bins, sequences, audio syncing, and export, are enough to produce professional business video. Practise on low-stakes content first: internal recordings, short social clips, repurposed webinar footage. Build the muscle memory for the cuts and keyboard shortcuts before moving on to more complex projects.
If you would rather focus on what your business does best and have your video produced professionally, ProfileTree’s video production team works with businesses across Northern Ireland, Ireland, and the UK. If you want the skills in-house, our digital training programmes are built around the tools your team will actually use.
Either way, the goal is the same: a video that represents your business well and reaches the right people.
Frequently Asked Questions
What is the best video editing software for a small marketing team?
For teams producing a mix of high-quality brand content and high-volume social content, a two-tool approach works well. Adobe Premiere Pro handles anything that needs professional output quality: hero videos, testimonials, case studies, and YouTube content. Canva’s video editor or CapCut handles fast-turnaround social posts where speed matters more than fine control. Trying to do both in Premiere Pro slows everything down; trying to do both in Canva limits quality on the content that matters most.
How much does a video editor cost in the UK?
A junior video editor in the UK typically earns between £24,000 and £32,000 per year. Mid-weight editors with two to four years of experience range from £32,000 to £45,000. Freelance day rates for experienced editors run from £250 to £500, depending on the project type and location. Agency production costs vary considerably by scope; a professional brand film from a reputable agency typically starts at £3,000 to £5,000 and rises quickly for more complex productions. These figures are indicative and should be verified with current job listings and production briefs.
How do you sync audio in Premiere Pro?
Import your separate audio file, place it on a new audio track below your video, then align the waveform spikes from both tracks visually. Right-clicking the timeline and selecting ‘Show Audio Time Units’ gives you finer control. Once synced, unlink the video from its original in-camera audio, delete the in-camera track, and relink the video to the separate audio using Ctrl+L (Cmd+L on Mac).
What export settings should I use for YouTube in Premiere Pro?
H.264 format, 1920×1080 resolution, 25fps (for UK footage), VBR 2 pass encoding, target bitrate 16 Mbps. Use the built-in ‘YouTube 1080p Full HD’ preset as a starting point and enable ‘Use Maximum Render Quality’ in the video export settings.
Is it worth learning Premiere Pro, or should I outsource video editing entirely?
It depends on your output volume. If your business produces more than four or five videos per month for social media and YouTube, learning Premiere Pro or training a team member saves significant budget over time. If you produce video occasionally for high-stakes purposes — a brand film, a product launch, a client case study — professional production will consistently outperform in-house work at those output levels and is usually the better investment.
Can Premiere Pro automatically caption video?
Yes. Premiere Pro’s Speech to Text feature generates automatic captions from your audio. The accuracy is good for clear audio with a neutral accent, and requires manual review for regional accents or technical vocabulary. Generated captions can be exported as SRT files for uploading alongside YouTube or LinkedIn videos, or burned directly into the video file on export.