Master Google Tag Manager and Unlock Website Insights
Table of Contents
Google Tag Manager is a free tag management system that lets you add, edit, and remove tracking scripts on your website without touching the underlying code. Instead of asking a developer to hard-code every analytics snippet, pixel, or third-party script directly into your site, you install one GTM container snippet once, and then manage everything else through the GTM interface.
Think of it as a switchboard for your website’s data collection. Your Google Analytics tag, your Meta Pixel, your LinkedIn Insight Tag, your cookie consent triggers: all of them can live inside one GTM container, fired according to rules you define.
For SMEs in the UK and Ireland, this matters for two reasons. First, it removes the developer bottleneck every time your marketing team needs to track something new. Second, it gives you a single point of control for managing what data you collect and when, which is increasingly important under UK GDPR requirements.
Google Tag Manager vs Google Analytics 4: Clearing the Confusion
These two tools are frequently confused because they’re often set up at the same time. They do very different things.
| Feature | Google Tag Manager | Google Analytics 4 |
|---|---|---|
| Primary function | Deploys and manages tracking scripts | Stores, processes, and reports on data |
| Collects data? | No — it sends it | Yes — it receives and analyses it |
| Stores data? | No | Yes |
| Requires coding? | Minimal for standard setups | No |
| Lives on your website? | Yes (container snippet) | No (cloud-based) |
| Can work without the other? | Yes, with other analytics tools | Not if GTM is your only deploy method |
The simplest way to understand the relationship: GTM is the delivery system, GA4 is the warehouse. GTM fires a tag when someone completes a purchase; GA4 records that event, attributes it to a traffic source, and surfaces it in your reports. You need both, and GTM is typically the right place to manage the GA4 tag alongside everything else.
Why UK Businesses Need GTM
The most common reason people give for using GTM is that it means “no coding required.” That’s true for basic setups, but it understates the real value for anyone running a serious digital marketing operation.
Speed and Agility
Without GTM, adding a new tracking script typically means raising a ticket, waiting for a developer, testing in a staging environment, and pushing to production. With GTM, a trained marketer can deploy a new conversion tag in under an hour. For fast-moving campaigns where you need to track specific actions quickly, this matters.
Version Control and Rollback
GTM keeps a full version history of every container change. If a new tag breaks something, you can roll back to a previous version without touching code. This gives marketing teams confidence to test and experiment without risking the live site.
Data Governance
For UK businesses, GTM’s centralised structure is particularly useful for managing data collection responsibly. When everything flows through one container, you can see exactly what scripts are firing, when, and for whom. That visibility is valuable when you’re demonstrating GDPR compliance to clients, auditors, or the ICO.
As Ciaran Connolly, founder of ProfileTree, explains: “When we audit a client’s website, one of the first things we check is whether GTM is set up and whether consent triggers are configured properly. Most businesses are collecting data without realising they’re doing so outside the scope of what their cookie banner actually permits.”
The Big Three: Tags, Triggers, and Variables
Every action in GTM is governed by three components. Understanding how they work together is the foundation of effective tag management.
Tags: The ‘What’
A tag is the script or tracking code you want to fire. Examples include:
- A Google Analytics 4 configuration tag (sends data to your GA4 property)
- A Meta Pixel base code (enables Facebook and Instagram ad tracking)
- A LinkedIn Insight Tag (tracks conversions from LinkedIn campaigns)
- A custom HTML tag (any third-party script that doesn’t have a GTM template)
GTM provides native templates for the most common tags, so you don’t need to write code for standard setups. For anything bespoke, the custom HTML option accepts any script.
Triggers: The ‘When’
A trigger tells GTM when to fire a tag. Without a trigger, a tag never executes. Common triggers include:
- All Pages: Fires on every page load (used for the GA4 configuration tag)
- Page View: Fires when a specific URL loads (e.g., a thank-you page after a form submission)
- Click: Fires when a user clicks a specific button or link
- Form Submission: Fires when a form is successfully submitted
- Scroll Depth: Fires when a user scrolls to a defined percentage of the page
- Consent Initialisation: Fires before any other tag, used to check consent status
For most SME websites, the most important triggers are form submission (to track leads) and page views on the thank-you page (to track completed enquiries or purchases).
Variables: The ‘How’
Variables are dynamic values that tags and triggers can reference. They allow you to pass contextual information into your tags, such as the value of a purchase, the text of a clicked button, or the URL of the current page.
Built-in variables include Click Text, Click URL, Page URL, and Form ID. Custom variables can pull data from your site’s data layer, a structured JavaScript object that developers can configure to pass specific values to GTM. For e-commerce tracking or anything requiring transaction data, data layer variables are essential.
How to Install Google Tag Manager: A Step-by-Step Guide
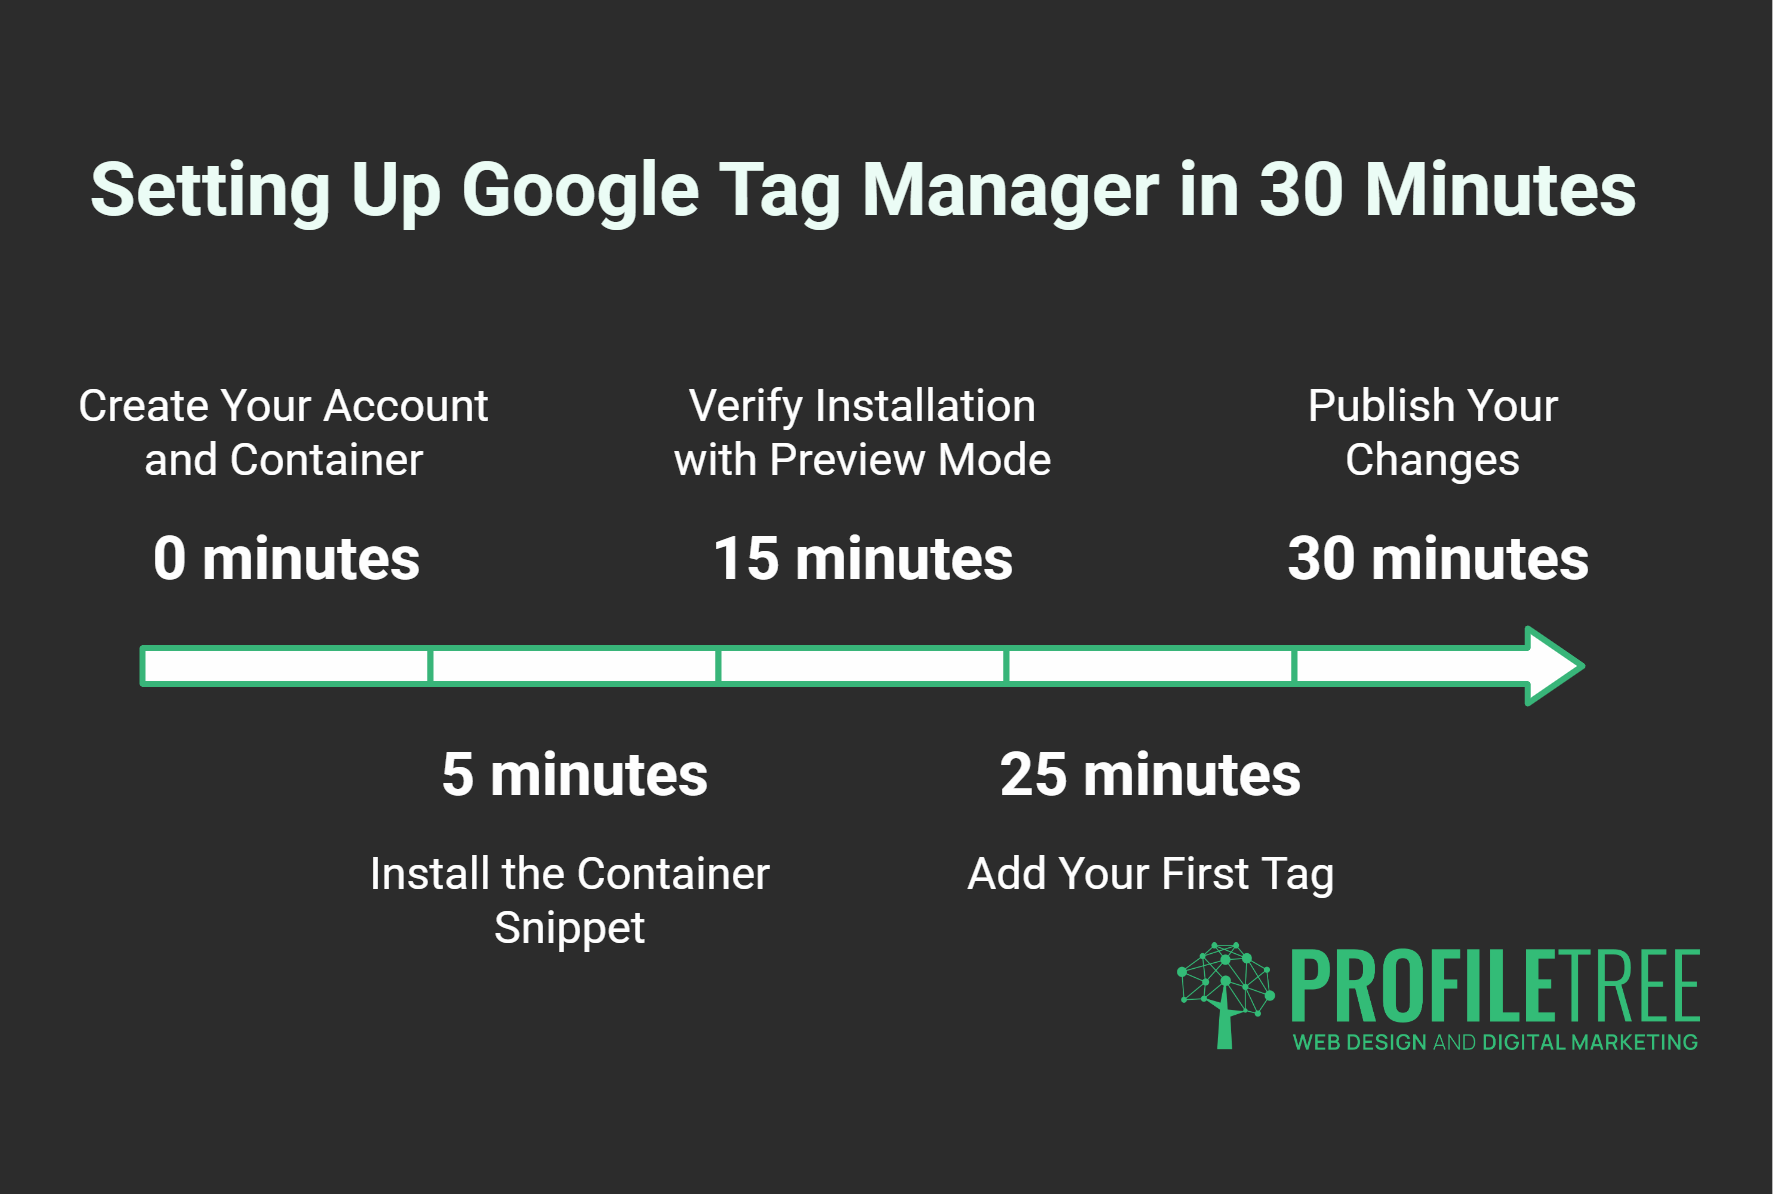
Setting up GTM for the first time takes around 30 minutes if your website is on a standard platform like WordPress or Shopify.
Step 1: Create Your Account and Container
Go to tagmanager.google.com and sign in with a Google account. Click Create Account, enter your company name, select your country (United Kingdom), and enter your website URL as the container name. Select Web as the target platform.
Step 2: Install the Container Snippet
GTM provides two code snippets. The first goes in the <head> section of your website; the second goes immediately after the opening <body> tag. Both are required for GTM to function correctly.
On WordPress: The simplest method is to use a plugin such as Insert Headers and Footers to place the snippets without editing theme files directly. Alternatively, most premium themes include a header/footer injection field in their settings. GTM4WP is a purpose-built plugin that handles both snippets and adds data layer support for WooCommerce.
On Shopify: Go to Online Store > Themes > Edit Code. Add the <head> snippet to your theme.liquid file inside the <head> tags, and the <body> snippet immediately after <body>. Shopify’s checkout pages require separate configuration via the Additional Scripts field in Settings > Checkout.
On custom HTML sites: Add the snippets directly to your site template so they appear on every page.
Step 3: Verify Installation with Preview Mode
Before publishing anything, use GTM’s built-in Preview mode. Click Preview in the GTM workspace, enter your website URL, and a debug panel will open at the bottom of your browser. This shows every tag that fired on each page load, the trigger that caused it, and the variables associated with it.
Preview mode is your most important debugging tool. Any tag that doesn’t appear in the panel when you expect it to has either a misconfigured trigger or a configuration error in the tag itself.
Step 4: Add Your First Tag
The most common first tag is the GA4 Configuration tag. In GTM, go to Tags > New > Tag Configuration > Google Analytics: GA4 Configuration. Enter your Measurement ID (found in GA4 under Admin > Data Streams). Set the trigger to All Pages. Save and preview to confirm it fires correctly. Once verified, click Submit to publish.
GTM and UK GDPR: Consent Mode v2
This is where most GTM guides fall short, and where UK businesses face genuine legal exposure if they get it wrong.
Under UK GDPR and the Privacy and Electronic Communications Regulations (PECR), you cannot fire marketing or analytics tags before a user gives consent. A cookie banner that collects consent but doesn’t actually prevent tags from firing is not compliant, regardless of what it looks like.
Google’s Consent Mode v2, which became mandatory for Google Ads advertisers in March 2024, addresses this by allowing GTM tags to operate in two modes: granted (full data collection) and denied (limited, modelled data only). Configuring it correctly requires a consent management platform (CMP) that integrates with GTM.
Integrating a Consent Management Platform
UK-compatible CMPs include CookieBot, CookieYes, OneTrust, and Usercentrics. Most provide a GTM template that handles the consent signals automatically. The CMP fires a consent update event in GTM based on the user’s choices, and GTM uses this to control which tags are permitted to fire.
The Consent Initialisation Trigger
GTM includes a special trigger type called Consent Initialisation. Tags set to this trigger fire before any other tags, including the CMP itself. This is where you place the Consent Mode default configuration, which sets all consent types to denied until the user actively grants them.
The correct sequence is:
- Consent Initialisation trigger fires (sets defaults to denied)
- CMP loads and presents the cookie banner
- User makes a choice
- CMP fires a consent update event in GTM
- GTM re-evaluates which tags are now permitted to fire
- Permitted tags fire accordingly
If you’re using Google Ads conversion tracking or running remarketing campaigns in the UK, this configuration is not optional. The ICO’s updated guidance on cookies and similar technologies is clear that consent must be freely given, specific, and obtained before tracking begins.
ProfileTree’s digital marketing services include GTM configuration as part of campaign setup for clients running paid media in the UK and Ireland.
Will GTM Slow Down My Website?
This is one of the most common concerns, and the answer is: it depends on what’s inside the container.
GTM itself loads asynchronously, meaning it doesn’t block the rest of your page from loading while it initialises. The impact on Core Web Vitals from GTM alone is minimal. The performance risk comes from tag bloat: loading too many third-party scripts, particularly ones that aren’t deferred or async, can significantly increase Total Blocking Time and Largest Contentful Paint scores.
A well-managed GTM container with 5–10 tags has a negligible performance impact. A container with 30+ tags, including heavy scripts from advertising platforms, chat widgets, and heatmap tools, can add several seconds to page load time on mobile connections.
The mitigation is container governance: auditing tags regularly, removing anything unused, and using GTM’s built-in trigger conditions to fire tags only on pages where they’re needed, rather than on every page load. ProfileTree’s web development team includes GTM performance audits as part of site speed optimisation projects.
Server-Side Tagging: Is It Worth It?
Server-side tagging moves tag processing from the user’s browser to a cloud server you control. Instead of your visitor’s browser loading scripts from Google, Meta, and LinkedIn directly, it communicates with your own server, which then forwards data to those platforms.
The benefits are real but come with cost and complexity. Server-side tagging bypasses many ad blockers, improves data accuracy for users who block client-side scripts, and reduces the number of third-party scripts loading in the browser. It also enables better cookie lifetimes, since first-party cookies set by your server are less likely to be restricted by browser privacy features like Safari’s Intelligent Tracking Prevention.
The cost is meaningful: you need a cloud server instance (typically Google Cloud Run, which costs roughly £50–£150 per month depending on traffic), and setup requires developer involvement.
For most SMEs in Northern Ireland and Ireland running standard Google Ads and Meta campaigns, client-side GTM with correct Consent Mode v2 configuration is sufficient. Server-side tagging becomes worth the investment when you’re spending significant budget on paid media, have high volumes of users who block scripts, or are operating in a sector where data accuracy is critical to attribution.
Container Governance: Keeping GTM Clean
GTM containers accumulate tags over time. Agencies add pixels, developers add scripts, and nobody removes the ones that are no longer needed. A cluttered container is harder to debug, more likely to cause performance issues, and more difficult to audit for GDPR compliance.
Good container governance means:
- A consistent naming convention for every tag, trigger, and variable (for example:
GA4 - Event - Form Submit - Contact Page) - A workspace-per-project approach, so changes are isolated and reviewed before publishing
- Regular audits to identify and remove unused tags
- Access permissions are set appropriately, so only trained users can publish changes
- Version notes on every published container version explaining what changed and why
If you’ve inherited a GTM container from a previous agency or developer and aren’t sure what’s in it, an audit is the right starting point before making any changes.
Frequently Asked Questions
Is Google Tag Manager free?
Yes. GTM is free for the vast majority of businesses. Google Tag Manager 360, part of the Google Marketing Platform enterprise suite, adds additional features such as increased tag firing limits and dedicated support, but standard GTM has no cost and no tag limit that affects typical SME usage.
Does GTM replace Google Analytics?
No. They serve different purposes. GTM deploys and manages tracking scripts; Google Analytics 4 receives, stores, and reports on the data those scripts send. Most businesses use GTM to deploy the GA4 tag alongside other marketing and analytics tools. Removing GTM wouldn’t remove GA4 from your data; it would just mean deploying GA4 through another method.
Does Google Tag Manager require coding?
For standard setups, no. Adding a GA4 tag, a Meta Pixel, or a LinkedIn Insight Tag through GTM’s native templates requires no code. More advanced implementations, such as custom event tracking, e-commerce data layer configuration, or server-side tagging, do require developer input. The more you want to customise what data is collected and how it’s structured, the more technical the work becomes.
How do I check if GTM is installed correctly?
Two methods. First, use GTM’s own Preview mode, which shows you exactly which tags fired on each page. Second, install the Google Tag Assistant browser extension (Chrome), which identifies GTM containers and highlights configuration errors. Both are free and require no additional setup.
Is GTM GDPR compliant?
GTM itself is a neutral tool; it doesn’t collect or store data. Whether your GTM implementation is GDPR-compliant depends entirely on how you’ve configured it. If tags fire before consent is obtained, that’s a compliance issue with your configuration, not with GTM. Correct implementation requires a consent management platform integrated with GTM, Consent Mode v2 configured with appropriate defaults, and tags set to fire only after the relevant consent is granted.
Can I use GTM for mobile apps?
Yes. GTM supports iOS and Android app containers through Firebase. The setup process differs from web containers: you integrate the Firebase SDK into your app, which then communicates with GTM to fire tags based on app events. For web-focused SMEs, the web container is the standard use case.
Getting GTM Right From the Start
Google Tag Manager is one of those tools that rewards getting right early. A well-structured container, with proper consent configuration, a clean naming convention, and tags firing only where they should, makes every marketing campaign easier to track and every analytics report more reliable. A poorly configured container compounds problems over time: inaccurate data, compliance risk, and performance drag that’s difficult to diagnose.
For businesses in Northern Ireland and across the UK starting from scratch or inheriting a messy setup, it’s worth investing time in the foundation. ProfileTree’s digital marketing team works with clients on GTM configuration as part of broader analytics and campaign setup work. If you’d like support getting your container in order, get in touch with our team.